A Jspresso application from A to Z
This chapter will help you to understand the basics of the Jspresso application framework and how to work with it.
- Setting-up the development environment
- The human resources (HR) sample application-sample-application)
- Layering the application
- Describing the domain model
- Describing the views
- Wiring the application
- Creating and registering application workspaces and modules
- Packaging and deploying
Setting-up the development environment
One of the interesting feature of Jspresso is its native integration with standard build tools. All the complex build process is completely handled in Maven. Jspresso also offers a Maven archetype to quickly setup your project and import it directly in Eclipse.
Installing the tools
Download, install and configure the following tools :
The Java Development Kit for your platform (JDK 6+).
The Apache Maven project management tool (3.0+).
The Eclipse IDE for Java EE Developers (3.6+).
the Apache Tomcat servlet container (6.0+).
You must also increase the java heap space allocated to Maven :
on windows :
set MAVEN_OPTS=-Xmx512m(or set it as a user env variable)on linux :
export MAVEN_OPTS=-Xmx512m(or set it as a user env variable)
Generating the skeleton project
This is a one-step operation using the Jspresso application Maven archetype. Move to your Eclipse workspace and perform :
- `mvn archetype:generate
-DarchetypeCatalog=http://repository.jspresso.org/maven2/`
And choose the “Jspresso Application Archetype”.
Then fill-in the questions with the following answers :
“groupId” :
org.jspresso.hrsample“artifactId” :
hrsample“package” :
org.jspresso.hrsample“version” :
1.0-SNAPSHOT
This will generate a complete project ready to be compiled and packaged
under the hrsample/ directory. So move to the generated directory and
type :
mvn package
The operation may take some time to finish since Maven will download all
the needed plugins and dependencies in its local repository. Just wait
for the “BUILD SUCCESSFUL” message and you should have a packaged
hrsample-webapp.war in the hrsample/webapp/target/ directory.
Importing the project in Eclipse
Follow the installation steps described on the Jspresso site and then import the project skeleton you've generated using the M2Eclipse project import wizard.
The development environment is now set-up. We can begin the Human Resources sample application coding.
The human resources (HR) sample application
The human resources application is a simple yet comprehensive business application targeted at managing a company organization and the employees who work in it. It will demonstrate how Jspresso can handle a domain model with its relationships and its constraints, present it to the end-user for manipulation through various built-in views and actions, handle security through profile management, distribute the frontend across the network, ...
The domain model
To quickly introduce the HR domain model, let's dive into the following UML class diagrams. As a general rule to make the diagrams more readable, attributes must be considered as getter / setter pairs.
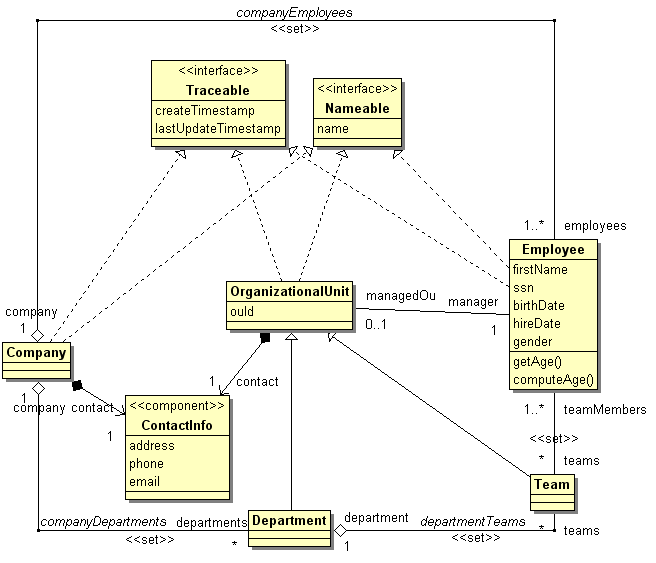
The commons class diagram describes commonly used interfaces and classes.
A few hints :
The traceable interface is implemented by entities for which we need to record when it was saved for the first time and when it was last updated. Of course, these tracing elements must be made read-only to the end-user since they are automatically managed by the application.
The nameable is implemented by entities having a name. A name has a max length of 64 characters and is mandatory. Nameable implements a service which formats its name (a really simple service only for demonstration purpose).
The contact information component is used by entities that have contact details (address, phone, email, ...). A contact information points to one and only one city. A city is nameable and has a zip code of maximum length 10 characters.
An event is a piece of text which is traceable

The employees class diagram describes what an employee is.
A few hints :
An employee is nameable and traceable. An employee has :
a first name (his last name is inherited by the nameable interface)
a social security number which is composed by exactly 10 digits and which is unique among all employees
a gender (male or female)
a birth date
a hire date in the company
a contact information
a preferred color
a flag indicating if (s)he is married
a salary
a photo
An employee must provide a method to compute his age based on his birth date.
An employee has an ordered list of events.

The organization class diagram describes how the company is structured in departments and teams.
A few hints :
A company is structured in organizational units. An organizational unit may be a department or a team. An organizational unit has an identifier (ouId) which is formed by a 2 letter code followed by a dash followed by a 3 digit number (IS-001 for instance). Each organizational unit has a manager who is an employee of the company it belongs to. An employee can at most manage one organizational unit. An organizational unit is nameable, traceable and has contact information as well as a company has.
The company may have one or more departments and a department belongs to one and only one company.
A department may have one or more teams and a team belongs to one and only one department. Each team is composed by one or more employees.
An employee belongs to one and only one company. An employee may belong to zero or more teams.
The application workspaces
The HR application is divided in 3 workspaces.
The organization management workspace
This workspace manages a company structure in terms of organizational units. The end-user may create/delete/update a company, create/delete/update its organizational units and structure them in the organization. The end-user may compose the employee teams, assign an organisational unit manager but won't be able to create/update/delete an employee. The organization must be displayed in a hierarchical (tree) view.
The employees management module
This workspace manages a company staff. The end-user can retrieve the company employees and create/update/delete an employee.
The master data management module
This module manages the application master data. As of now, the master data are only made of the cities available to compose the addresses.
The profiles
The HR application offers 3 profiles.
The organization manager profile
A logged-in user having the organization manager profile will be granted access to the organization management workspace as well as the master data management workspace but he won't be able to access the employee management workspace.
The staff manager profile
A logged-in user having the staff manager profile will be granted access to the employee management workspace as well as the master data management workspace but he won't be able to access the organization management workspace.
The administrator profile
The administrator profile has no restriction in the application.
Layering the application
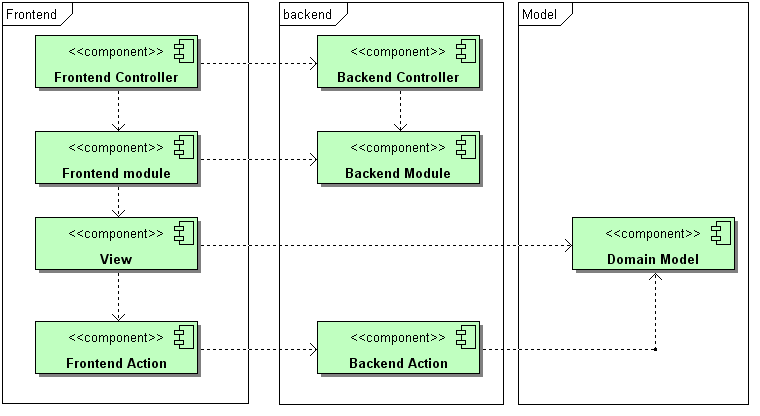
Now that we have collected the detailed specifications, it's time to feed the framework with them. As we saw before, most of the job will consist in describing the different layers in a structured way. But before going further, let's define the best practices regarding the logical layering of a typical Jspresso application (although these practices may generally apply to any well designed application). We will define 3 logical layers from the bottom to the top :
The domain model
The backend
The frontend
This organisation will help to prevent cyclic dependencies between layers since each layer will be allowed to use lower ones but not higher ones (e.g. : the backend may use the domain model but not the frontend).
Of course, this is a minimal logical layering. Each of this layer may be further divided in subparts depending on the software complexity. For instance the domain model might be divided in master and movement data and the backend and frontend may be divided in modules. It's entirely up to the application designer to tailor these rules. But it surely is the first design activity.
The general architecture diagram introduces this layering strategy.
Let's define now what precisely go in these layers.
The domain model
The domain model includes :
The entities. An entity will be described by :
properties along with their constraints and their interceptors
behaviour (business methods, life-cycle interceptors)
integrity enforcements
default presentation elements (name, icon, rendered properties, ordering properties)
relationships to other entities (cardinality, reversibility)
The components. A component has all the characteristics of an entity except that it is not autonomous since It is designed as a structure to be inlined in an entity (e.g. : an address structure).
Other structural elements like common business interfaces.
We will see later that there virtually any domain model can be extensively described using Jspresso. This includes for instance polymorphic entities or associations, multiple inheritance, and so on.
The backend
The backend includes all the application parts that do not depend on the client :
The actions server parts (which interact with the domain model for instance)
The application workspaces along with their hierarchy of modules. A workspace is a top application entry point which is directly accessible by the end user.
The application modules. They form a hierarchy since modules may contain other modules. Each module is an independent application part targeted at accessing the backend data (domain model manipulation, reporting, ...).
The backend controller which holds the user backend application state and its configuration (in-memory model state)
The frontend
The frontend includes all the application parts that interact directly with the end-user :
The views
The action client parts (which handle user interaction and trigger action server parts)
The client application module parts
The frontend controller which holds the user frontend application state and its configuration (workspaces and modules state)
Describing the domain model
In this chapter, you will learn how to feed the Jspresso framework with the sample domain model description.
Using the "Sugar for Jspresso" DSL
The preferred way of writing applications is to use the new Jspresso Groovy based DSL (Domain Specific Language) : "Sugar for Jspresso" - aka SJS. The SJS DSL was thought from the very begining to stay compatible with Spring XML which was the legacy language used in Jspresso. This means that during the build, the SJS authored files are "compiled" to generate Spring XML files that are loaded in the Spring context beside the legacy ones. So you can :
develop only using SJS.
develop only using Spring XML.
develop using SJS and Spring XML and even reference on one side, components that are defined on the other side.
For instance, describing your application model will be a matter of
writing SJS code into the model.groovy file located here :
hrsample/core/src/main/dsl/model.groovy
Authoring SJS code is greatly simplified when using Jspresso Developer Studio, so make sure you've correctly installed it.
Here is what the default generated model.groovy looks like :
// Implement your domain here using the SJS DSL.
Note
For those who are familiar with Jspresso Spring XML, and want to migrate smoothly to SJS, you can always have a look to the SJS generated Spring config files. For instance,
model.groovywill be translated intohrsample/core/target/generated-resources/dsl/org/jspresso/hrsample/model/dsl-model.xmlby the SJS compiler.
In all example given using the SJS DSL, pay special attention to conventions. For instance, package names are most of the time inferred and you will rarely change the default. This feature makes SJS code much more compact and easier to read than plain Spring XML.
Interfaces
As a starting point, we will describe the commons model part.
The Nameable interface may be described as follow :
Interface ('Nameable') {
  string_64 'name', mandatory:true
}
Since we are describing a generic interface (which may or may not turn
to be an entity) we will use an Interface keyword. We name the
interface `. By convention, since we are in the org.jspresso.hrsample
namespace, this will turn into a org.jspresso.hrsample.model.Nameable
interface class. We declare a String property, with a maximum length of
64 chars. We name this propertyname, so that the correspondinggetName()andsetName(String)` accessors will be generated. We make
this property mandatory.
As you can see above, we create an interface descriptor
(org.jspresso.hrsample.model.Nameable) with one property (name)
along with its constraints (maxLength and mandatory). This is a
fairly simple interface since it has no intrinsic behaviour nor
relationships with other components.
So now, lets describe the Traceable interface as follow :
Interface('Traceable',
          uncloned:['createTimestamp', 'lastUpdateTimestamp']) {
  date_time 'createTimestamp', readOnly:true, timeZoneAware:true
  date_time 'lastUpdateTimestamp', readOnly:true, timeZoneAware:true
}
Whenever an entity implementing the Traceable interface is cloned by
Jspresso, the cloning process will ignore both tracing properties. We
declare a date property for which the time portion will be preserved.
The date property is made read-only, i.e. it will only be updated
programatically. The date property is a technical date, i.e. it is
sensitive to the client / server timezones difference. It will translate
differently depending on the client timezone.The Traceable interface
description is slightly more complicated than the Nameable interface
since not all properties are eligible to cloning (uncloned).
Generating the domain model code
It is time now to get our interfaces generated before going further. Let's use the Jspresso generation tool to make it happen.
As we saw before the Jspresso build is completely integrated in Maven. This includes domain model code generation. You can trigger the build from an external terminal window or directly from the IDE using an maven Eclipse plugin. Navigate to your project root folder and type :
mvn compileNote
If you want to speed up this generation phase, instead of launching
mvn compilefrom thehrsample/root folder, you can lauch it from thehrsample/core/folder which is the project module that holds the domain model.
Go back to Eclipse and refresh your project - F5 - so that the generated java source is detected. You may now have a look to the following folder to see the generated java source files :
hrsample/core/target/generated-sources/entitygenerator/org/jspresso/hrsample/model
Alternatively you can directly use the Eclipse “Open type” function to
Quickly navigate navigate to the generated Nameable and Traceable
types.
Note
Jpresso uses compile time generation of the domain model classes and resources. Generated artifacts always go into
target/generated-xxxfolders. You should never place any hand-written code in these generated source folders since they can be deleted at any time during amaven cleanoperation. Always use standard maven source folders (src/main/javaandsrc/main/resources).
You should have now the 2 generated classes :
Nameable.javafor the Nameable interface (see the source code below).Traceable.javafor the Traceable interface.
package org.jspresso.hrsample.model;

/**
 * Nameable component.
 * <p>
 * Generated by Jspresso. All rights reserved.
 * <p>
 *
 * @author Generated by Jspresso
 */
public interface Nameable {

  /**
   * Gets the name.
   *
   * @hibernate.property
   * @hibernate.column
   *           name = "NAME"
   *           length = "64"
   *           not-null = "true"
   * @return the name.
   */
  java.lang.String getName();

  /**
   * Sets the name.
   *
   * @param name
   *          the name to set.
   */
  void setName(java.lang.String name);

}
These 2 java classes are actually java interfaces with getters and setters for the declared properties. In fact, you will never need any implementation for them since Jspresso will automatically handle their implementation for you at runtime using J2SE proxies. This approach relieves the developer from writing the implementation classes and thus, improves quality, robustness and productivity.
You may also notice that the generator took care of annotating the classes with hibernate xDoclet attributes. They will be used later to generate the necessary persistence meta-data.
Adding life-cycle behaviour
What about the handling of the Traceable properties ? We want them to
follow the life-cycle of any traceable entity, i.e. :
Set the
createTimestampwhen the entity is persisted for the first time.Set the
lastUpdateTimestampwhen the entity is updated in the persistent store.
It is time to write our first lines of java to achieve that. Navigate to
the /hrsample/core/src/main/java source folder and create the
life-cycle interceptor
org.jspresso.hrsample.model.service.TraceableLifecycleInterceptor java
class as follow :
package org.jspresso.hrsample.model.service;

import java.util.Date;

import org.jspresso.hrsample.model.Traceable;
import org.jspresso.framework.model.component.service.EmptyLifecycleInterceptor;
import org.jspresso.framework.model.entity.IEntityFactory;
import org.jspresso.framework.model.entity.IEntityLifecycleHandler;
import org.jspresso.framework.security.UserPrincipal;

/**
 * Default lifecycle service for tracing.
 */
public class TraceableLifecycleInterceptor extends
    EmptyLifecycleInterceptor<Traceable>  {

  /**
   * Sets the create timestamp.
   * <p>
   * {@inheritDoc}
   */
  @Override
  public boolean onPersist(Traceable traceable, IEntityFactory entityFactory,
      UserPrincipal principal, IEntityLifecycleHandler entityLifecycleHandler) {
    traceable.setCreateTimestamp(new Date());
    return true;
  }

  /**
   * Sets the last update timestamp.
   * <p>
   * {@inheritDoc}
   */
  @Override
  public boolean onUpdate(Traceable traceable, IEntityFactory entityFactory,
      UserPrincipal principal, IEntityLifecycleHandler entityLifecycleHandler) {
    traceable.setLastUpdateTimestamp(new Date());
    return true;
  }
}
The class inherits from the support class EmptyLifecycleInterceptor
which empty implements the required life-cycle interceptor interface
EmptyLifecycleInterceptor as well as the marker interface
IComponentService.
Whenever a Traceable component is persisted (saved for the first
time), set its createTimestamp.
Return true to notify the framework that the state of the component has been updated.
Whenever a Traceable component is updated (subsequent saves), update
its lastUpdateTimestamp.
We can now link the life-cycle interceptor to our Traceable interface
bean descriptor as below :
Interface('Traceable',
    interceptors:'TraceableLifecycleInterceptor',
    uncloned:['createTimestamp', 'lastUpdateTimestamp']) {
  ...
}
Defines an ordered list of life-cycle interceptors attached to the component. Note that, by convention, we can ommit the package of the TraceableLifecycleInterceptor class, since it will be inferred from the current namespace.
Entities
As of now, we have only dealt with interfaces which are not entities by themselves. Describing an entity follows the exact same process except that we make its descriptor an entity descriptor.
So let's describe the City entity as below :
Entity('City',
       extend:'Nameable') {
  string_10 'zip'
}
We are now declaring a concrete entity, thus using the Entity keyword.
We make the entity inherit from the interface, so it will bring
the name property.
the Jspresso Maven compilation will produce the following class
(City.java) :
package org.jspresso.hrsample.model;

/**
 * City entity.
 * <p>
 * Generated by Jspresso. All rights reserved.
 * <p>
 *
 * @hibernate.mapping
 *           default-access = "org.jspresso.framework.model.persistence\
 *                             .hibernate.property.EntityPropertyAccessor"
 * @hibernate.class
 *   table = "CITY"
 *   dynamic-insert = "true"
 *   dynamic-update = "true"
 *   persister = "org.jspresso.framework.model.persistence.hibernate.entity\
 *                .persister.EntityProxyJoinedSubclassEntityPersister"
 * @author Generated by Jspresso
 */
public interface City extends
  org.jspresso.hrsample.model.Nameable,
  org.jspresso.framework.model.entity.IEntity  {

  /**
   * @hibernate.id generator-class = "assigned" column = "ID" type = "string"
   *               length = "36"
   * <p>
   * {@inheritDoc}
   */
  java.io.Serializable getId();

  /**
   * @hibernate.version column = "VERSION" unsaved-value = "null"
   * <p>
   * {@inheritDoc}
   */
  Integer getVersion();

  /**
   * Gets the zip.
   *
   * @hibernate.property
   * @hibernate.column
   *           name = "ZIP"
   *           length = "10"
   * @return the zip.
   */
  java.lang.String getZip();

  /**
   * Sets the zip.
   *
   * @param zip
   *          the zip to set.
   */
  void setZip(java.lang.String zip);

}
City is an entity so the generator made it inherit from IEntity
which is a Jspresso framework base class.
You might notice that there are slightly more hibernate xDoclet tags
(class level tags, id and version) to handle the entity persistence
specifics. But as for Nameable and Traceable, the City entity is
not more than an interface and its implementation will be completely
handled by the framework.
Components
A component is a data structure which is intended to be inlined in other components or entities. Like entities and interfaces, you can define properties and behaviour in a component. A component cannot live by itself. It is an elegant mean to factor common data and behaviour into higher level model parts.
So let's describe the ContactInfo component as below :
Component('ContactInfo') {
  string_256 'address'
  string_32  'phone'
  string_128 'email', regex:"[\\w\\-\\.]*@[\\w\\-\\.]*", regexSample:'[email protected]'
}
Since ContactInfo is an component, we use a Component keyword. This
is a special kind of string constraint enforcement through a regular
expression; we want an email to conform to contain the @ sign, be
without space and be only composed of literals plus '.' and '-'.
Whenever there is some kind of communication to initiate (an invalid
value for instance), this is an example of a correct value.
Relaunching the Jspresso generator will produce the following class
(ContactInfo.java) :
package org.jspresso.hrsample.model;

/**
 * ContactInfo component.
 * <p>
 * Generated by Jspresso. All rights reserved.
 * <p>
 *
 * @author Generated by Jspresso
 */
public interface ContactInfo extends
  org.jspresso.framework.model.component.IComponent  {

  /**
   * Gets the address.
   *
   * @hibernate.property
   * @hibernate.column
   *           name = "ADDRESS"
   *           length = "256"
   * @return the address.
   */
  java.lang.String getAddress();

  /**
   * Sets the address.
   *
   * @param address
   *          the address to set.
   */
  void setAddress(java.lang.String address);

  /**
   * Gets the phone.
   *
   * @hibernate.property
   * @hibernate.column
   *           name = "PHONE"
   *           length = "32"
   * @return the phone.
   */
  java.lang.String getPhone();

  /**
   * Sets the phone.
   *
   * @param phone
   *          the phone to set.
   */
  void setPhone(java.lang.String phone);

  /**
   * Gets the email.
   *
   * @hibernate.property
   * @hibernate.column
   *           name = "EMAIL"
   *           length = "128"
   * @return the email.
   */
  java.lang.String getEmail();

  /**
   * Sets the email.
   *
   * @param email
   *          the email to set.
   */
  void setEmail(java.lang.String email);

}
ContactInfo is an entity so the generator made it inherit from
IComponent which is a Jspresso framework base class.
You might have notice that the ContactInfo component is missing
something : its relationship to the City entity.
Unidirectional relationships
It's time to link our first components together.
Unidirectional N-1 relationships
Let's first deal with the simple unidirectional association
ContactInfo -> City. We are going to define a city property in
the ContactInfo component.
The following SJS fragment will do the trick :
Component('ContactInfo') {
  ...
  reference 'city', ref:'City'
  ...
}
ContactInfo has a reference to the City entity so we describe this
using a reference keyword. We link the reference property to the
City entity we described above.
Relaunching the Maven compilation will update the ContactInfo.java
source file we generated above, but since this is a unidirectional
relationship, the City.java file will remain untouched. The following
lines are added in the ContactInfo.java source file :
  /**
   * Gets the city.
   *
   * @hibernate.many-to-one
   *           cascade = "persist,merge,save-update,refresh,evict,replicate"
   * @hibernate.column
   *           name = "CITY_ID"
   * @return the city.
   */
  org.jspresso.hrsample.model.City getCity();

  /**
   * Sets the city.
   *
   * @param city
   *          the city to set.
   */
  void setCity(org.jspresso.hrsample.model.City city);
Again, the needed hibernate xDoclet tags are added to reflect the relationship between the component and the entity.
To end with the commons model part, let's define the Event entity :
Entity('Event',extend:'Traceable'){
  html 'text', maxLength:2048 , id:'Event-text'
}
An event is a Traceable entity. We use a html property instead of a
string one. This is to inform the framework that this property is used
to store HTML formatted data; although there is no direct impact on the
model layer (it is still stored as a String), it might be useful in
the view layer (e.g. : use a rich text area instead of a text field to
display and edit the Event text property). We assign explicitely an id
to the text property. This is to be able to reference it individually
from another layer (e.g. the view layer). By default, only reference and
collection properties are implicitly assigned an id in the form
Owner-property. We kept this convention to declare an id on the text
property.
This first relationship is fairly simple since it is a n-1 unidirectional association. Of course, the Jspresso can also seamlessly handle 1-n, 1-1 and n-n unidirectional and bi-directional associations and compositions (strong aggregations).
Now that we are done with the commons model part, let's see how we can handle the employees model part.
Inlined components
The Employee entity is fairly simple to describe giving what we
already achieved.
Let's look at the SJS code below :
Entity ('Employee',
        extend:['Nameable','Traceable']) {
  string_32 'firstName', mandatory:true
  string_10 'ssn', regex:'[\\d]{10}', regexSample:'0123456789', unicityScope:'empSsn'
  date 'birthDate'
  date 'hireDate'
  enumeration 'gender', enumName:'GENDER', mandatory:true, valuesAndIcons:[
              'M':'male-48x48.png',
              'F':'female-48x48.png']
  color 'preferredColor'
  bool 'married'
  decimal 'salary', minValue:0
  binary 'photo', maxLength:1048576, id:'Employee-photo',
         fileFilter:['images':['.jpg']],
         fileName:'photo.jpg'
  password 'password', maxLength:32
  reference 'contact', ref:'ContactInfo', id:'contact'
}
We defined a regular expression control on the ssn property since it
must be composed of 10 and only 10 digits. We define a unicity domain
for the ssn property. This will translate in a unique key definition
in the persistent store. We don't care about the time information of
this date; so we use a date keyword as opposed to the date_time
keyword that we used for the Traceable interface. This is a new type
of property. This one defines a finite choice of values. We define each
of the values composing the choice for the gender enumeration (either
'M' or 'F') along with icons if available. This defines a color
property. Color properties are internally stored as their RGBA base 16
encoded value, but are visualized and edited using a color chooser un
the UI. This defines a boolean property. This defines a decimal
property. This defines a binary property. It comes with a file filter to
set up the file extensions that are to be configured when the user
chooses a file to upload in order to fill in this property value as well
as a default filename that is used whensaving the property content to a
file. This defines a password property. It is stored internally as a
string but is visually represented using a password field. This is where
we reference the ContactInfo component.
The employee description above shows that it is strictly equivalent - as far as description is concerned - to reference an entity or to inline a component (see the contact reference). The difference will be in the persistence store and in the views since an inlined component will have its attributes "merged" with the enclosing component as if they belonged to it.
Unidirectional 1-N relationships
You have surely noticed that we did not describe the 1-N composition
between Employee and Event. This will be our first collection
property and its description is actually quite straightforward :
And the SJS way (note that SJS will automatically generate a top-level bean for the collection property, with an id in the form of Owner-property, i.e. Employee-events) :
Entity ('Employee'...) {
  ...
  list 'events', composition:true, ref:'Event'
  ...
}
We are describing a collection relationship property. Since we want an
arbitrary, persistent, order using an index, we declare it as a list.
If we didn't want to actually persist an arbitrary order (which is the
vast majority of the cases), we would have used a set semantic using
the set keyword. We make this relationship a composition to express
the fact that whenever an employee is deleted, the attached events must
also be deleted. Our collection property lists events; so we reference
the Event entity as being the element type of our collection.
Note
SJS automatically generates an automatic id for collection properties and for reference properties. The generated id has the form of Owner-property, i.e. Employee-events
Launching the Jspresso generator will generate the Employee.java
source file :
package org.jspresso.hrsample.model;

/**
 * Employee entity.
 * <p>
 * Generated by Jspresso. All rights reserved.
 * <p>
 *
 * @hibernate.mapping default-access =
 *                    "org.jspresso.framework.model.persistence\
 *                     .hibernate.property.EntityPropertyAccessor"
 * @hibernate.class table = "EMPLOYEE"
 *   dynamic-insert = "true"
 *   dynamic-update = "true"
 *   persister = "org.jspresso.framework.model.persistence.hibernate.entity\
 *                .persister.EntityProxyJoinedSubclassEntityPersister"
 * @author Generated by Jspresso
 */
public interface Employee extends org.jspresso.hrsample.model.Nameable,
    org.jspresso.hrsample.model.Traceable,
    org.jspresso.framework.model.entity.IEntity {

  /**
   * @hibernate.id generator-class = "assigned" column = "ID" type = "string"
   *               length = "36"
   *               <p>
   *               {@inheritDoc}
   */
  java.io.Serializable getId();

  /**
   * @hibernate.version column = "VERSION" unsaved-value = "null"
   *                    <p>
   *                    {@inheritDoc}
   */
  Integer getVersion();

  /**
   * Gets the firstName.
   *
   * @hibernate.property
   * @hibernate.column name = "FIRST_NAME" length = "32"
   * @return the firstName.
   */
  java.lang.String getFirstName();

  /**
   * Sets the firstName.
   *
   * @param firstName
   *            the firstName to set.
   */
  void setFirstName(java.lang.String firstName);

  /**
   * Gets the ssn.
   *
   * @hibernate.property
   * @hibernate.column name = "SSN" length = "10" unique-key = "EMP_SSN_UNQ"
   * @return the ssn.
   */
  java.lang.String getSsn();

  /**
   * Sets the ssn.
   *
   * @param ssn
   *            the ssn to set.
   */
  void setSsn(java.lang.String ssn);

  /**
   * Gets the birthDate.
   *
   * @hibernate.property type = "date"
   * @hibernate.column name = "BIRTH_DATE"
   * @return the birthDate.
   */
  java.util.Date getBirthDate();

  /**
   * Sets the birthDate.
   *
   * @param birthDate
   *            the birthDate to set.
   */
  void setBirthDate(java.util.Date birthDate);

  /**
   * Gets the hireDate.
   *
   * @hibernate.property type = "date"
   * @hibernate.column name = "HIRE_DATE"
   * @return the hireDate.
   */
  java.util.Date getHireDate();

  /**
   * Sets the hireDate.
   *
   * @param hireDate
   *            the hireDate to set.
   */
  void setHireDate(java.util.Date hireDate);

  /**
   * Gets the gender.
   *
   * @hibernate.property
   * @hibernate.column name = "GENDER" length = "1" not-null = "true"
   * @return the gender.
   */
  java.lang.String getGender();

  /**
   * Sets the gender.
   *
   * @param gender
   *            the gender to set.
   */
  void setGender(java.lang.String gender);

  /**
   * Gets the contact.
   *
   * @hibernate.component prefix = "CONTACT_"
   * @return the contact.
   */
  org.jspresso.hrsample.model.ContactInfo getContact();

  /**
   * Gets the preferredColor.
   *
   * @hibernate.property
   * @hibernate.column
   *           name = "PREFERRED_COLOR"
   *           length = "10"
   * @return the preferredColor.
   */
  java.lang.String getPreferredColor();

  /**
   * Sets the preferredColor.
   *
   * @param preferredColor
   *          the preferredColor to set.
   */
  void setPreferredColor(java.lang.String preferredColor);

  /**
   * Gets the married.
   *
   * @hibernate.property
   * @hibernate.column
   *           name = "MARRIED"
   *           not-null = "true"
   * @return the married.
   */
  boolean isMarried();

  /**
   * Sets the married.
   *
   * @param married
   *          the married to set.
   */
  void setMarried(boolean married);

  /**
   * Gets the salary.
   *
   * @hibernate.property
   * @hibernate.column
   *           name = "SALARY"
   *           precision = "10"
   *           scale = "2"
   * @return the salary.
   */
  java.math.BigDecimal getSalary();

  /**
   * Sets the salary.
   *
   * @param salary
   *          the salary to set.
   */
  void setSalary(java.math.BigDecimal salary);

  /**
   * Gets the photo.
   *
   * @hibernate.property
   * @hibernate.column
   *           name = "PHOTO"
   *           length = "1048576"
   * @return the photo.
   */
  byte[] getPhoto();

  /**
   * Sets the photo.
   *
   * @param photo
   *          the photo to set.
   */
  void setPhoto(byte[] photo);

  /**
   * Gets the password.
   *
   * @hibernate.property
   * @hibernate.column
   *           name = "PASSWORD"
   *           length = "32"
   * @return the password.
   */
  java.lang.String getPassword();

  /**
   * Sets the password.
   *
   * @param password
   *          the password to set.
   */
  void setPassword(java.lang.String password);

  /**
   * Sets the contact.
   *
   * @param contact
   *            the contact to set.
   */
  void setContact(org.jspresso.hrsample.model.ContactInfo contact);

  /**
   * Gets the events.
   *
   * @hibernate.list cascade =
   *                 "persist,merge,save-update,refresh,evict,replicate,delete"
   * @hibernate.key column = "EVENTS_EMPLOYEE_ID"
   * @hibernate.one-to-many class = "org.jspresso.hrsample.model.Event"
   * @hibernate.list-index column = "EVENTS_SEQ"
   * @return the events.
   */
  java.util.List<org.jspresso.hrsample.model.Event> getEvents();

  /**
   * Sets the events.
   *
   * @param events
   *            the events to set.
   */
  void setEvents(java.util.List<org.jspresso.hrsample.model.Event> events);

  /**
   * Adds an element to the events.
   *
   * @param eventsElement
   *            the events element to add.
   */
  void addToEvents(org.jspresso.hrsample.model.Event eventsElement);

  /**
   * Adds an element to the events at the specified index. If the index is out
   * of the list bounds, the element is simply added at the end of the list.
   *
   * @param index
   *            the index to add the events element at.
   * @param eventsElement
   *            the events element to add.
   */
  void addToEvents(int index,
      org.jspresso.hrsample.model.Event eventsElement);

  /**
   * Removes an element from the events.
   *
   * @param eventsElement
   *            the events element to remove.
   */
  void removeFromEvents(org.jspresso.hrsample.model.Event eventsElement);

}
As you can see above, the generator has generated all the accessors for
the events list property. If the events property had been designed as a
set instead of a list, the adder using the index would not have been
generated and the get/set pair would of course have used a
java.util.Set instead of a java.util.List.
Now that the employees model part is complete, let's deal with the organization.
Entity inheritance
The organization model part is the most complex of the example, since it involves entity inheritance (and polymorphism) and other kinds of relationships (1-1, bi-directional). So let's begin with the entity inheritance graph and we will deal with their relationships next :
Entity('Company',
       extend:['Nameable', 'Traceable']) {
  reference 'contact', ref:'ContactInfo'
}

Entity('OrganizationalUnit',
       extend:['Nameable', 'Traceable'],
       purelyAbstract:true) {
  string_6 'ouId', regex:"[A-Z]{2}-[\\d]{3}", regexSample:'AB-123', mandatory:true
  reference 'contact', ref:'ContactInfo'
}

Entity('Department',
       extend:'OrganizationalUnit')

Entity('Team',
       extend:['OrganizationalUnit'])
An OrganizationalUnit will never be instantiated as such; only
sub-entities will. This is why we define the entity as purely abstract.
Department inherits from OrganizationalUnit as do Team.
Pretty easy, no ? You describe entity inheritance exactly as you did previously for the interfaces. You don't have to care for anything else, the framework will handle it behind the scene for you.
You can see also that Company, OrganizationalUnit, and Employee
have the same contact property as an inlined ContactInfo component. It
is a perfect candidate for factoring. So we can make the contact
property descriptor a top level reference, name it contact and reference
it in the 3 entities above. The result will be :
Entity('Employee'...) {
  ...
  reference 'contact', ref:'ContactInfo', id:'contact'
  ...
}

Entity('Company'...) {
  ...
  refId 'contact', id: 'contact'
  ...
}

Entity('OrganizationalUnit'...) {
  ...
  refId 'contact', id: 'contact'
  ...
}
We factor the contact property in a top level referenceable element
named "contact". We reference the contact bean as a property of the
Company entity We reference the contact bean as a property of the
OrganizationalUnit abstract entity.
Now that we have described our organization entities, let's link them together using relationships.
Bi-directional relationships
It is time see how the Jspresso framework handles relationships that are navigable at both ends.
Bi-directional 1-N relationships
We are going to describe the Company \<-> Department bi-directional
1-N relationship. To achieve that, we will first describe the N side of
this composition, making it a top-level, referenceable bean and then
make this N side the reverse end of the 1 side of the composition. This
is achieved using the following SJS fragment :
Entity('Company'...) {
  ...
  set 'departments', composition:true, ref:'Department'
}

Entity('Department'...) {
  ...
  reference 'company', ref:'Company', reverse:'Company-departments', mandatory:true
}
Like we did before for the employee events, we describe collection
property for the company departments. This time, the collection
property has a set semantic. We link both side of the Company \<->
Department relationship assigning 1 side reverse of the other.
So making a relationship bi-directional is quite straightforward. We just have to reference one end of the relationship in the other end as being the reverse end. Although the generated java code will not be directly impacted by making a relationship bi-directional, hibernate xDoclet tags will be. More important is the impact on how the framework will handle the relationship updates behind the scene for you.
Making the Company \<-> Department relationship bi-directional
implies the following on the Company side:
Whenever a department is added to a company through the
addToDepartments(Department)adder, the passed-in department will have its company property updated accordingly. In the (unexpected) case that the department was part of another company, it will be removed from its previous company departments before being added to the new one.Whenever a set of departments set as the company departments through the
setDepartments(Set<Department>)setter, all the passed-in departments will have their company property updated accordingly. In the (unexpected) case that the departments were part of other companies, they will be removed from their previous respective company departments before being added to the new one. Moreover, all existing departments in the company before the update will have their company property reset.Whenever a department is removed from a company through the
removeFromDepartments(Department)remover, the passed-in department will have its company property reset tonull. In the (unexpected) case that the department was part of another company, it will be removed from its previous company departments.
And on the Department side :
- Whenever a company is set in a department through the
setCompany(Company), the company departments is updated accordingly. In the case that the passed-in company isnull, the department will just be removed from its previous company if any.
As you can see above, you can expect the Jspresso framework to extensively and transparently manage any bi-directional relationship for you. Just call whatever accessor you want and the domain model will be updated consistently.
We describe the Department \<-> Team relationship the same way :
Entity('Department'...) {
  ...
  set 'teams', composition:true, ref:'Team'
}

Entity('Team'...) {
  reference 'department', ref:'Department', reverse:'Department-teams', mandatory:true
}
And, to be complete, the Company \<-> Employees relationship :
Entity('Company'...) {
  ...
  set 'employees', composition:true, ref:'Employee'
}

Entity('Employee'...) {
  reference 'company', ref:'Company', reverse:'Company-employees', mandatory:true
}
Bi-directional 1-1 relationships
The next type of relationship we will handle in the HR application is
the 1-1 OrganizationalUnit \<-> Employee manager association. And
you have certainly already guessed that it is the exact same way to
describe bi-directional 1-1 relationships than 1-N relationships except
that both ends are reference property descriptors :
Entity('Employee'...) {
  ...
  reference 'managedOu', ref:'OrganizationalUnit', reverse:'OrganizationalUnit-manager'
}

Entity('OrganizationalUnit'...) {
  ...
  reference 'manager', ref:'Employee'
}
Of course, setting one end of the 1-1 relationship will also update the other end accordingly without having to take care of it.
Bi-directional N-N relationships
Certainly one of the most difficult relationship to handle in business
software development is the N-N relationship navigable at both ends.
Here again, Jspresso handles all the complex plumbing for you. All you
need to do is to declare both ends of the relationship as being a
collection property descriptor. The following SJS fragment illustrates
this for the Team \<-> Employee relationship :
Entity('Employee'...) {
  ...
  set 'teams', ref:'Team'
}

Entity('Team'...) {
  ...
  set 'teamMembers', ref:'Employee', reverse:'Employee-teams'
}
Of course, when re-generating the entities code, Employee and Team
will have the corresponding collection accessors generated and whenever
one side of the relationship is updated, the other one will also reflect
the change.
Component services
As of now, we have only dealt with Jspresso component properties. There
might be situations where you want (or you need) your domain model
components to implement arbitrary interfaces (maybe legacy interfaces)
and provide an arbitrary implementation for them. The Jspresso framework
supports it at any level of the domain model. As an example, let's
consider the EmployeeService interface that we want all of our
employee components to implement. This service provides one method to
compute age based on a birth date passed as parameter. Whenever the
passed-in date is null, the returned age will also be.
Let's see how we can attach this service :
Entity('Employee',
       ...
       services:[EmployeeService:'EmployeeServiceDelegate']) {
  ...
}
We declare the services and their implementations attached to the
Employee entity. By convention, the interface EmployeeService
belongs to a package deduced from the namespace, i.e.
org.jspresso.hrsample.model.service.EmployeeService. By convention, the
implementation EmployeeServiceDelegate belongs to a package deduced
from the namespace, i.e.
org.jspresso.hrsample.model.service.EmployeeServiceDelegate.
Here is the EmployeeService.java source file :
package org.jspresso.hrsample.model.service;

import java.util.Date;

/**
 * Services offered by the Employee entity.
 */
public interface EmployeeService {

  /**
   * Computes the employee age.
   *
   * @param birthDate
   *            the employee birth date.
   * @return the computed age based on the birth date or null if the birt date
   *         is not available.
   */
  Integer computeAge(Date birthDate);
}
And the EmployeeServiceDelegate.java source file :
package org.jspresso.hrsample.model.service;

import java.util.Date;

import org.jspresso.hrsample.model.Employee;
import org.jspresso.framework.model.component.service.IComponentService;

/**
 * The services delegate of the Employee entity
 */
public class EmployeeServiceDelegate implements IComponentService {

  /**
   * Computes the employee age.
   *
   * @param employee
   *            the employee this service execution has been triggered on.
   * @param birthDate
   *            a birth date (might be different than the actual employee birth
   *            date).
   * @return the age computed from the birth date passed as parameter.
   */
  public Integer computeAge(Employee employee, Date birthDate) {
    if (birthDate != null) {
      return new Integer(
          (int) ((new Date().getTime() - birthDate.getTime()) / (1000L * 60 * 60 * 24 * 365)));
    }
    return null;
  }
}
We mark the delegate as implementing IComponentService. We declare the
method with the same name than the service method. The parameter list is
the same than the service method with the target component instance to
trigger the service on inserted at the beginning of the list.You will
notice that EmployeeServiceDelegate does not itself implements
EmployeeService. This is simply because although the names of the
implemented methods must match, their signature is augmented by the
component instance to work on. This allows the Jspresso framework to
share services delegates across multiple component instances.
A re-generation of the Employee.java source updates the Employee
definition so that it now implements the EmployeeService interface :
...
public interface Employee extends
  org.jspresso.hrsample.model.Nameable,
  org.jspresso.hrsample.model.Traceable,
  org.jspresso.framework.model.entity.IEntity,
  org.jspresso.hrsample.model.service.EmployeeService {
...
}
Again, Jspresso will seamlessly take care of triggering the delegates' methods, passing the right parameters, whenever the service is requested on the target component.
Computed properties
Not all properties have a representation in the persistent store. Some
of them may be computed using other parts of the domain model. For
instance, in the Employee entity, the age property is one of them. It
is fairly easy to compute the age of an employee from his birth date and
this is the service we have just implemented above. Of course computed
properties are not limited to entities. They can be declared on any
Jspresso managed component (inlined components, interfaces and
entities). And they are not limited to scalar properties. Even a
collection property or a reference property may be computed this way.
Let's see how we can link it using Jspresso :
Entity('Employee', extension :'EmployeeExtension'
       ...
       ) {
  ...
  integer 'age', minValue:0, maxValue:150, readOnly:true,
}
We declare the EmployeeExtension delegate class. The extension package
is determined by convention from the namespace, i.e.
org.jspresso.hrsample.model.extension.EmployeeExtension. We declare the
age property as being computed by the extension.
As you can see in the above fragment, the age property is almost
described like any other standard entity property. What differs is the
reference to the
org.jspresso.hrsample.model.extension.EmployeeExtension java class
that will be used to compute it. So let's code it :
package org.jspresso.hrsample.model.extension;

import org.jspresso.hrsample.model.Employee;
import org.jspresso.framework.model.component.AbstractComponentExtension;

/**
 * Helper class computing extended properties for Employee entity.
 */
public class EmployeeExtension extends
    AbstractComponentExtension<Employee>  {

  /**
   * Constructs a new <code>EmployeeExtension</code> instance.
   *
   * @param extendedEmployee
   *            The extended employee instance.
   */
  public EmployeeExtension(Employee extendedEmployee) {
    super(extendedEmployee);
  }

  /**
   * Computes the employee age.
   *
   * @return The employee age.
   */
  public Integer getAge() {
    return getComponent().computeAge(getComponent().getBirthDate());
  }
}
The employee extension class inherit from the
AbstractComponentExtension framework base class. We implement the
getAge() method which is triggered by the framework whenever the age
property is accessed on an employee. Note the use of the
getComponent() method to retrieve the instance of employee this
extension is attached to. This will be the starting point for exploring
the domain model and computing arbitrary complex attributes. We call the
service method we have implemented in the previous chapter.Implementing
the employee extension class as above is plainly licit but might lead to
performance issues for more complex computations. In fact, each time the
age property is requested, the getAge() method is triggered. This is
not painful for the simple age implementation but imagine that you had
to do a CPU or network consuming computation to return the computed
property !
Moreover, whenever the birth date is modified, no one is notified that the age changes since we did not implement anywhere the dependency "birth date ⇒ age".
Pushing the analysis further shows that the age of an employee does not change until his birth date changes (which is very unlikely). So a more efficient implementation for the employee extension class consist in keeping the computed age value for later use and listening to changes of the birth date property to invalidate the age cached value. Hopefully, the implementation is almost straightforward since every Jspresso managed component can be listened to for property changes.
The following update of the Employee.java source file fixes the 2
caveats described above :
package org.jspresso.hrsample.model.extension;

import java.beans.PropertyChangeEvent;
import java.beans.PropertyChangeListener;

import org.jspresso.hrsample.model.Employee;
import org.jspresso.framework.model.component.AbstractComponentExtension;
import org.jspresso.framework.util.bean.IPropertyChangeCapable;

/**
 * Helper class computing extended properties for Employee entity.
 */
public class EmployeeExtension extends AbstractComponentExtension<Employee> {

  private Integer age = null;

  /**
   * Constructs a new <code>EmployeeExtension</code> instance.
   *
   * @param extendedEmployee
   *            The extended Employee instance.
   */
  public EmployeeExtension(Employee extendedEmployee) {
    super(extendedEmployee);
    extendedEmployee.addPropertyChangeListener("birthDate",
        new PropertyChangeListener() {

          public void propertyChange(PropertyChangeEvent evt) {
            Integer oldAge = age;
            age = null;
            getComponent().firePropertyChange("age", oldAge,
                IPropertyChangeCapable.UNKNOWN);
          }
        });
  }

  /**
   * Computes the employee age.
   *
   * @return The employee age.
   */
  public Integer getAge() {
    if (age != null) {
      return age;
    }
    age = getComponent().computeAge(getComponent().getBirthDate());
    return age;
  }
}
The age cache attribute. We attach to the birth date property to be
notified of a change. Whenever the birth date changes, we invalidate the
age cache. And we notify listeners, if any, of the age property change.
Note the use of the UNKNOWN constant. This is to avoid useless
computations if there is no listener attached to the age property; the
computation will only be triggered when the age property is actually
requested. Whenever the age cache is valid, return it. If it has not
been computed yet or if the cache has just been invalidated, perform the
computation.When re-generating the Employee.java source file, you will
notice that the getAge() method will be added but without any
hibernate xDoclet annotation since the age property is not related to
the Employee persistence. Once again, the framework will completely
take care of calling the delegate class whenever the age property is
requested.
The key advantages of this type of modularization are :
Easy switching between implementations. You might have a mock implementation for the early stage of the development and when the job is done, switch with the real one. You could also switch the implementations depending on the environment you deploy to.
Clear separation of concerns allowing an efficient distribution of work between developers.
Ease of monitoring and testing. The code responsible of the implementation can be easily instrumented.
Property processors
A clean and efficient domain model design assigns to the business objects the responsibility of maintaining their integrity.
This implies :
Checking a property before it gets actually modified. Trying to set a value that would compromise the business object integrity must be prevented and should raise a clear notification.
Being able to intercept a setter to change the value actually set (e.g. ensuring a string is uppercase).
Triggering some extra computation when a property value gets actually updated.
The first point is partially covered by some of the constraints that can be assigned on the property descriptors; assigning a maximum value to an integer property descriptor or a regular expression to a string property descriptor are such controls. Unfortunately, there are situations when these type of controls are not enough because, for instance, the integrity of the component is checked against its global state (a property value is constrained by the values of other properties of the business object or even of other business objects of the model).
As far as the second and third points are concerned, we have seen nothing yet that would help to cover it.
Fortunately, the Jspresso framework allows you to implement property processors that can be registered with any property you define on a Jspresso managed component. This includes :
Pre-update property processors to cover pre-update controls on setters for scalar, reference and collection properties and adders and removers for collection properties.
Interceptors to transform the value before it's actually set on the business object.
Post-update property processors to trigger post-update computations for scalar, reference and collection properties and adders and removers for collection properties.
Let's define some simple integrity constraints on our domain model :
An employee first name should be automatically formatted like this : first letter capitalized and the remaining letters in lower case; this is a setter interceptor on the employee first name property. We could have implemented this constraint using a regular expression check, but this would have forced the end user to type-in a compliant first name instead of automatically making it compliant through computation.
An employee can not be hired if he is not at least 18 years old; this is a pre-update integrity processor on the employee birth date property.
The following SJS fragment declares these processors :
Entity('Employee'
       ...
       processor:'EmployeePropertyProcessors'
       ) {
  ...
  string_32 'firstName', mandatory:true, processors:'FirstNameProcessor'
  ...
  date 'birthDate', processors:'BirthDateProcessor'
  ...
}
We declare a a class for holding all the property processors of the
Employee entity, i.e. EmployeePropertyProcessors. By convention, the
processor package is determined from the namespace, i.e.
org.jspresso.hrsample.model.processor.EmployeePropertyProcessors. Each
property processor will be an internal static class of this enclosing
type. We declare FirstNameProcessor as being a processor for the
firstName property. We declare BirthDateProcessor as being a
processor for the birthDate property.
As described in the SJS fragment, we are going to create an
EmployeePropertyProcessors class in the new package
org.jspresso.hrsample.model.processor.
Let's see what those processors look like by looking at the
EmployeePropertyProcessors.java source file :
package org.jspresso.hrsample.model.processor;

import java.util.Date;

import org.jspresso.hrsample.model.Employee;
import org.jspresso.framework.util.bean.integrity.EmptyPropertyProcessor;
import org.jspresso.framework.util.bean.integrity.IntegrityException;

/**
 * Employee property processors.
 */
public class EmployeePropertyProcessors {

  /**
   * Birth date property processor.
   */
  public static class BirthDateProcessor extends
      EmptyPropertyProcessor<Employee, Date> {

    /**
     * Checks that the employee age is at least 18.
     * <p>
     * {@inheritDoc}
     */
    @Override
    public void preprocessSetter(Employee employee,
        Date newBirthDate) {
      if (newBirthDate == null
          || employee.computeAge(newBirthDate).intValue() < 18) {
        throw new IntegrityException("Age is below 18", "age.below.18");
      }
    }
  }

  /**
   * First name property processor.
   */
  public static class FirstNameProcessor extends
      EmptyPropertyProcessor<Employee, String> {

    /**
     * Formats the new first name. The formatting is :
     * <li>Capitalize the 1st letter
     * <li>Lower case all the other letters
     * <p>
     * {@inheritDoc}
     */
    @Override
    public String interceptSetter(Employee employee,
        String newFirstName) {
      if (newFirstName != null && newFirstName.length() > 0) {
        StringBuffer formattedName = new StringBuffer();
        formattedName.append(newFirstName.substring(0, 1).toUpperCase());
        formattedName.append(newFirstName.substring(1).toLowerCase());
        return formattedName.toString();
      }
      return super.interceptSetter(employee, newFirstName);
    }
  }
}
We declare an internal class as being a processor for the birth date
property and inherit from the EmptyPropertyProcessor empty adaptor
class. We override the preprocessSetter to implement the age over 18
constraint. Whenever the condition is not met, we throw an
IntegrityException to stop the chain and notify the outside that the
property update could not be performed. The second parameter in the
exception is a bundle key used for internationalization; this is not
covered by this section. We declare an internal class as being a
processor for the first name property and inherit from the
EmptyPropertyProcessor empty adaptor class. We override the
interceptSetter to implement the first name formatting. We change the
first name actually set in the employee to the new computed value.Each
processor declared on a property is potentially a pre, post processor
and interceptor. To make a property processor a pre-only processor, just
leave the postprocessSetter and interceptSetter methods implementation
empty. Same applies to make property processor a post-only or
intercept-only processor by leaving the other methods implementation
empty. We encourage you, as shown in the example above, to make all your
processors inherit from the EmptyPropertyProcessor adapter class which
provide empty implementations for all required methods and then to
override the method you want to provide an implementation for.
Hibernate mapping
This is actually nothing to do. When you compiled the project with
maven, all the Hibernate mapping files were automatically generated by
xDoclet in the /hrsample/core/target/generated-resources/xdoclet
folder that is already declared as a source folder in the Eclipse
project. You might have a look to the generated files to chack how
Jspresso translated your model description into Hibernate mapping files.
Describing the views
Now that we designed the complete domain model, it is time to make it available to the end-user. So we need to design the views that will be part of our application. As promised, we won't need a single line of GUI code to achieve that. As for the domain model description, the goal will be :
To define precisely what we want.
To assemble descriptor beans in order to translate what has been specified into Jspresso view descriptors.
As far as we begin to deal with GUI, internationalization (I18N) comes into the game. Jspresso is definitely targeted at multi-lingual applications and as such, fully supports internationalized GUIs.
The views description will logically go to the
org.jspresso.hrsample.view package. An empty SJS file has been created
in the following folder (you can quickly navigate to it using the
Eclipse “Open resource” function) :
hrsample/core/src/main/dsl/view.groovy
Here is what it looks like :
// Implement your views here using the SJS DSL.
In order to ease the work of the GUI designer, Jspresso provides a view tester tool that enables an immediate java swing preview of each described view fragment. At the beginning of this tutorial, you should have imported the “view tester” configuration that alows you to launch the tool. No further configuration is needed.
Note
You are able to choose the language to use for displaying the tested view through the use of the
-languageoption in the “view tester” launch configuration. Whenever this option is omitted, the view tester will fall back to the platform default locale. Changing the language when testing a view will allow for early missing translations identification.Note
The view tester tool will not display fully functional views. For instance, list of values won't be available (the button will be displayed but won't trigger anything) since the view is not instantiated in the scope of a complete Jspresso application - no database, ... Its goal is only targeted at quickly previewing the GUI layout to promote agile development.
We can now begin to describe our first views.
Component views
One of the most heavily used type of view is the form-like component view. We will see in this section how to describe, translate and further customize a component view.
The first shot
Let's describe our first component view on the company entity in the
view.groovy file:
form 'Company.pane',
  parent:'decoratedView',
  labelsPosition:'ABOVE',
  columnCount:3
We declare a form-like component view. By convention, the view infers
its model from its name, i.e. the Company entity in this case. Wenever
you don't want to follow this convention, you can still override the
model type using the model attribute. We make the view inherit from a
Jspresso standard one which surrounds the view with a title. We want
each property label to be positioned above the property field. We could
have used the ASIDE constant to indicate that we wanted the labels
aside the fields. We want the component view to be organized in 3
columns.
Although there are plenty of configurations that can be applied to view descriptions (font, color, properties subset, ...), the previous SJS fragment is fully enough to get our first view up and running using the view tester.
Note
Unlike for the model components, there is no java generation nor compilation step involved; the view descriptors are just handled at runtime by Jspresso.
The view tester launch configuration has been set-up to instanciate and
display a view whose id is “testView”. As a result, we simply have to
reference the view to test in the view.groovy file as follows :
bean 'testView',
  parent:'Company.pane'
Now, launching the tester will produce the following result :
You will notice several things on the screenshot above :
The
namelabel has been colored in red and has a star marker. It is to indicate that the name property is mandatory as declared during the domain model design.The
createTimestampandlastUpdateTimestampproperty fields have been made non-editable as we declared them.The
contactinlined component has been splitted into its 4 properties (address,city,phoneandemail). The component properties are referred to using a nested property notation like component.property.The
cityproperty field has been added a list of value (LOV) button. This button will bring a dialog box allowing the user to look-up available cities and select one.Of course, leaving the field with an incomplete value would auto-complete the value if the typed-in string is sufficient to determine one and only one city or bring up the LOV dialog without for the user to push the LOV button. This reference field behaviour is only the consequence of having declared the
ContactInfo->Cityrelationship. In the view tester tool, the search button and the auto-completion are not functional since we don't have any backend to rely on.Whenever you try to type-in "aze" in the email property field, you will obtain the following error message :
This is due to the constraint we applied on the email property in the
ContactInfoinlined component.Finally, there are terms that are missing translations in English. Whenever Jspresso detects such a situation, it will "translate" the term using the following pattern [language:translation key]. This strategy allows for easy and fast identification of missing translations. You will also notice that the name label has been correctly translated. This is because "name" is part of the default translations. Of course, you may override this translation if you wish in the application I18N property files.
Internationalization
To complete the view design, we are going to translate the missing terms in the I18N property files we've opened previously. To ease the editing of the I18N property files, we recommend the use of a very good Eclipse plug in : the Resource Bundle Editor.
For instance, Messages_en.properties could be :
age.below.18 = Employee is not 18 years old.

org.jspresso.hrsample.model.Company = Company

contact.address = Address
contact.city    = City
contact.email   = Email
contact.phone   = Phone

createTimestamp = Created

hrsample.name = Human Resources management

lastUpdateTimestamp = Updated

zip = Code postal
And Messages_fr.properties :
age.below.18 = L'employ\u00E9 n'a pas 18 ans.

org.jspresso.hrsample.model.Company = Soci\u00E9t\u00E9

contact.address = Adresse
contact.city    = Ville
contact.email   = Email
contact.phone   = T\u00E9l\u00E9phone

createTimestamp = Cr\u00E9\u00E9 le

hrsample.name = Gestion des ressources humaines

lastUpdateTimestamp = Mis \u00E0 jour le

zip = Zip code
Relaunching the view test with the English locale will produce :
And with the French locale :
Customization
We certainly need to further customize the company view. This includes :
Selecting the properties we want to display.
Ordering the displayed properties.
Spanning properties across multiple columns.
Assume that we would like to hide the tracing properties since, after all, they are technical data. Then, we want to organize the fields in 2 columns instead of 3 having the company name to span over the 2 columns. Then we keep the order name, address, city, phone and email.
The following change to the view descriptor achieves that :
form 'Company.pane',
  ...
  columnCount:2,
  ...
  fields:['name','contact.address','contact.city','contact.phone','contact.email'],
  widths:[name:2]
We reduce the number of columns to 2. We explicitely declare the ordered
list of properties we want to display. We make the name property span
2 columns.
Note
Jspresso supports the use of nested properties for all descriptors. For instance, in the example above, we have used the
contact.phonenested property of theCompanyentity. It simply means the the field will referencecompany -> contact -> phoneof its underlying company model.
Relaunching the view tester will produce the following output :
You will notice that the name field is now alone on its line, spanning over the 2 columns of the view. Of course, the tracing properties have disappeared from the view.
There would have been another way to customize subset of displayed
properties for the company entity. We could have set on the Company
entity the rendered attribute that allows to set an ordered list of
properties to be displayed by default when an company instance is
displayed in any view. This change would have impacted all the
application company views (including tables for instance) except the
ones declare their own property list.
To summarize, a component view will display (higher in the list has higher priority) :
If set on the view, the
fieldsproperties.If set on the model, the
renderedproperties.All the properties, in their declaration order except the collection properties. In that case, the inlined components are splitted as we saw it for the first shot.
Composite views
Now that we have seen how to provide the end-user with basic component editing, we need to compose these views into more complex ones. As an example, let's say that you would like to have the tracing properties back in the company view, but in a separated panel so that the main screen is not overloaded by fields that are not useful at first sight. A classic way go is to introduce tabs with the tracing properties available in a secondary tab.
The first composite view
Such a tab panel is called a composite view; its objective is to assemble sub-views into a more user-friendly graphical structure. In the following SJS fragment, we will describe the component view to display the tracing properties and assemble the company view and the tracing view into a tab composite view :
form 'Traceable.pane',
  model:'Traceable',
  labelsPosition:'ABOVE',
  columnCount:2,
  fields:['createTimestamp','lastUpdateTimestamp']

tabs 'Company.tab.pane',
  views:['Company.pane','Traceable.pane']
We declare a new form view descriptor for the tracing properties. It's
backed by any Traceable model. We declare a tabbed composite view in
order to assemble our forms. We assign an ordered list of views to be
displayed in the tabs. Of course, these sub-views may be any type of
view, including other composite views.
After having completed the I18N property files with the
org.jspresso.hrsample.model.Traceable entry, we can launch the view
tester on the Company.tab.pane view :
Improving the view aspect
We can make the view a little more attractive by adding icons and tool tips. Using Jspresso, it is quite straightforward by completing the descriptors :
For the icons, we want to assign an image to the model components themselves so that whenever one of them is used as model, the framework may decide to use the image to improve the view appearance.
For the tool tips, it is more linked to the user interface itself, so we will declare it on the view; but in fact, we will not declare a tool tip as such but rather bring a description information to the view so that the framework may, at runtime, transform this description as a tool tip.
The following SJS fragment assigns an icon image to the Company and
the Traceable components :
Interface('Traceable',
          ...
          icon:'traceable-48x48.png') {
  ...
}

Entity('Company',
          ...
          icon:'company-48x48.png') {
  ...
}
We declare the image used to reference the image to be used to represent
a Traceable component. Same applies for the Company entity. The
actual image URL used is deduced by convention from the namespace. In
that case, the following pseudo URL is used :
classpath:org/jspresso/hrsample/images/traceable-48x48.png.
And we assign a more friendly description to both component views. As for every potentially displayed string, these descriptions are entries in the I18N property files that we will translate. The following SJS fragments achieves that :
form 'Traceable.pane',
  ...
  description:'traceable.editing'

form 'Company.pane',
  ...
  description:'company.editing'
We declare an I18N entry to describe the traceable component view. Same applies for the company component view.
Re-launching the view tester displays the following window :
There are several remarks regarding what we have just done :
Name, description and icons can be used in different layers of the application. Jspresso will then take advantage of these attributes to generate tool tips, to place icons, to fill-in labels in the following order (higher in the list has higher priority) :
Name, description and icon image URL (each attribute can be independently overridden) set on the view descriptor.
Name, description and icon image URL set the model descriptor on which the view descriptor relies.
To reference an image to be used as icon, you may use any kind of URL (HTTP, file) but Jspresso provides a very useful, specialized URL which is the
classpath:URL. Such a URL may be used to reference any resource present in the application classpath. As an example, we have used theclasspath:org/jspresso/hrsample/images/company-48x48.pngURL to load an image from theorg.jspresso.hrsample.imagespackage (this type of URL is used by convention in SJS but can be overriden if necessary). This prevents the developer from hard-coding references to application external resources and promotes portability across deployment environments.Whenever you want to link an icon image to a component or a view, you don't have to care about the actual size of the image. The framework will dynamically resize it for you at runtime, depending of what it wants to use it for. As a general rule, you might consider using little over sized images (48x48 is a good compromise) since image reduction won't degrade quality whereas image expansion will.
Other composite views
Jspresso offers a rich set of composite view descriptors. Although we won't detail them in this section, the following enumeration lists them :
BasicTabViewDescriptor(ortabsin SJS) to organize sub-views in tabs.BasicBorderViewDescriptor(orborderin SJS) to layout up to 5 sub-views at north, south, east, west and center.BasicSplitViewDescriptor(orsplit_[horizontal|vertical]in SJS) to layout 2 sub-view within a separator splitted panel. The orientation of the split may be vertical or horizontal.BasicEvenGridViewDescriptor(orevenGridin SJS) to layout an arbitrary number of sub-views into a grid with equally sized cells. As for component views, you only set up the driving dimension (horizontal or vertical), the maximum number of cells in the driving dimension and an ordered list of the sub-views to be contained in the cells. Whenever the line (or column) reaches the maximum number of cells allowed, a new line (or column) is created.BasicConstrainedGridViewDescriptor(orgridin SJS) lets you organize sub-views in a grid where each cell behaviour is determined by the following attributes :position (row, column)
height (row span) and width (column span)
width resizability and height resizability
This is certainly the most complex composite view descriptor but also the most powerful one.
Collection views
The next step in our frontend development is to display (and edit) collection relationships between components. We will achieve this using collection views; these type of views include multi-column table views and list views. In this section, you will learn how to build a multi-level master-detail view on the company structure.
The first collection view
We need to give access to the end-user a mean to edit the departments contained in a company. As we defined it in the domain model, there is a 1-N relationship between the two so we will design a table view that displays 1 department per row and link this view to the company one.
Let's consider the following SJS fragment :
table 'Company-departments.table',
  parent:'decoratedView'

split_vertical 'Company.organization.view',
  model:'Company',
  top:'Company.tab.pane',
  bottom:'Company-departments.table'
We declare a table view. Unlike component views, collection views are
backed by the N end of a 1-N relationship. Here, we reference the
Company -> Department relationship we've previously declared in the
domain model. This model is inferred by the naming convention, i.e. the
name begins with Company-department which is the implicit identifier
of the Company -> Department relationship. We organize the
departments table view and the company view in a new type of composite
view : a vertical split view. This composite view is still a view backed
by a company. The top part of the split view is the company component
view. The bottom part of the split view is the departments table view.
After adding the necessary translations as usual, and linking a new icon to describe the department entities, re-launching the view tester produces the following window :
Of course, this is not enough to be able to manage the departments of a company. We are missing a way to add and remove departments.
Assigning an action map to a view
Each view can be assigned an action map. An action map is a set of actions grouped by category. Consider an application menu bar. In this menu bar, you will find menus -action categories- like "File", "Edit", "Help" and in each menu, a list of individual actions. This is the exact same principle of an action map, but instead of being a rendered as a menu bar, the Jspresso framework will make a tool bar out of it, and in certain situations a context menu, that will make the actions available to the end user.
In this section, we won't go describe in detail how to develop and declare an action. Actually, Jspresso comes with a large set of pre-defined, ready-to-use general purpose actions (and even action maps) that are sufficient for most classic operations. Look at the following SJS fragment :
table 'Company-departments.table',
  ...
  actionMap:'masterDetailActionMap'
We assign the predefined master-detail action map to the departments table view.
These new lines bring us what we need to be able to operate efficiently the company departments relationship. Re-launching the view tester modifies the previous view :
Using this improved master detail view, we are now able to completely manage the departments of a company :
We can add, remove and duplicate a department.
We copy, cut and paste a department.
Of course, we might need to refine and re-order the department properties displayed in the table view. Do you remember what we did previously for the company component view ? We will do the same for the departments table collection view, but instead of working directly on the view, we will rework the department entity itself globally set its rendered properties; whenever we need a department based view to be customized differently, we still have the option to override this global setting on the view descriptor itself. So let's go back to the department entity descriptor :
Entity('Department',
    ...
    rendered:['ouId','name','manager','contact']) {
  ...
}
We set the ordered list of department default rendered properties.
And when we re-launch the view tester :
There are several things to notice on the screenshot above and that you can experiment in the view tester :
The columns have been refined to match the list of department's rendered properties.
Mandatory columns have been marked with an asterisk.
You can reorder and resize the columns as you wish.
Some actions (duplicate, remove, cut and copy) may be applied on 1 selected item but also on a set of selected items; in that case, multiple selection is performed by maintaining the CTRL (increase selection with an individual item) or the SHIFT (range selection) and even both (increase selection with a range) key pressed when selecting the table rows.
You can sort the lines of a table view on 1 column by clicking the column header and even on multiple columns (look at the address and city columns) by keeping the CTRL key pressed when clicking multiple column headers.
The editable columns have been assigned an editor that matches their model; this includes associations LOV (see the editing manager cell above) and field controls and auto-completion.
You might right-click on a selected line to open a context menu (not shown here) that will give you access to the same actions that are present in the tool bar.
To complete the organization view, we now need to manage the teams of a department.
Nested master-detail views
To handle the Department -> Team relationship, we need to add
another collection view backed by the 1-N association. The idea is to
append this table view at the bottom of the previous one, using a new
split view. Based on what we've already achieved, this is quite straight
forward except for a slight but tricky difference : the teams to be
displayed by the new table view are not directly related to the company
but to the selected department in the intermediate department table
view. So we need to instruct Jspresso that we want this nested
master-detail behaviour.
Let's first describe the teams collection view; for the sake of the tutorial, we will refine the teams displayed columns on the view itself instead of globally configuring the rendered properties of the team entity :
table 'Department-teams.table',
  parent:'decoratedView',
  actionMap:'masterDetailActionMap',
  columns:['ouId','name','manager']
We setup the ordered list of columns we want to display on the teams table.
This table view definition is strictly identical to the previous
department view. We now need to assemble the Company-departments.table
and the new Department-teams.table into a split view and tell Jspresso
to drive the teams table content with the departments table selection :
split_vertical 'Departments.and.teams.view',
  cascadingModels:true,
  top:'Company-departments.table',
  bottom:'Department-teams.table'
We declare a new split view. We declare this composite view a master-detail view for Jspresso to track the departments selection. We make the departments table view the top part of the view. We make the teams table view the top part of the view.
The crucial part of the previous definition is the use of the
cascadingModels attribute. It tells the framework that the sub-views
we are composing are not straightly backed by properties of the master
model, but each one will be driven by some kind of selection in the
previous one. Note that this attribute is available on all composite
views. Although some types of composite views are more adapted to
master-detail relationships (the split view for example), you might very
well decide to present arbitrary deep nested master-detail views in any
kind of composite view (a tab view for example; in this case, each tab
will be a detail of the previous one).
Then, we need to refactor the Company.organization.view to substitute
the current departments table view by our new
Departments.and.teams.view :
split_vertical 'Company.organization.view',
  model:'Company',
  top:'Company.tab.pane',
  bottom:'Departments.and.teams.view'
We assign the departments and teams master-detail view as being now the bottom part of the company organization view.
After adding some new translations and icons for the team entity, we can relaunch the view tester and obtain the following screen where you can fully manage the departments of a company and the teams of a department :
Although we have already designed a fairly usable GUI, you might want to go one step further by presenting to the end-user a hierarchical tree view of the organization. This is what we are going to achieve in the next section.
Tree views
Tree views are certainly the most complicated but also the most intuitive type of view to display and manage a structured model. Anyone who ever tried to build a truly MVC aware GUI using trees knows that there are many caveats to avoid. Jspresso drastically simplifies getting a tree view up and running while keeping its original description centric philosophy.
Simple tree levels
Let's consider our next objective as inserting a new tab in the previous company view that shows the company structure in a tree view. Describing a tree view is a matter of describing each tree level and assembling them. To describe the company organization tree, we are going to declare :
1 tree view :
Company.tree.1 tree level for the
Company->Department1-N relationship :Company-departments.subtreethat will be the first child tree level in the company tree.1 tree level for the
Department->Team1-N relationship :Department-teams.subtreethat will be the child tree level of the previous one.
Look at the following SJS fragment :
treeNode 'Department-teams.treeNode',
  rendered:'ouId',
  actionMap:'masterDetailActionMap'

treeNode 'Company-departments.treeNode',
  rendered:'ouId',
  actionMap:'masterDetailActionMap'

tree('Company.tree',
  rendered:'name',
  icon:'structure-48x48.png') {
  subTree('Company-departments.treeNode') {
    subTree('Department-teams.treeNode')
  }
}
We declare a simple tree level. This simple tree level is backed by the
Department -> Team relationship (inferred from the naming
convention) since it will display the teams of a department node. Each
node of a simple tree level - here it's a team - must be rendered by one
of its property. When not set, the rendering property is chosen by the
backing component itself. We want the ouId of a team to be displayed.
As for plain views, we can assign an action map to a simple tree level
through the action map of its referenced list view descriptor. The
registered action map will be accessible from a contextual menu. Here,
we assign the same master-detail action map as we used for the table
views. The tree view itself. It may be composed anywhere in the GUI. The
default icon used to display this view would be the icon declared in the
company entity. Let's change it so that we have a different icon once we
install the view in the tab. We compose the sub-trees as we want them to
appear hierarchically in the tree view. We set the
Company-departments.treeNode as being the first child tree level of
the tree. We set the Department-teams.treeNode tree level as being
nested into the Company-departments.treeNode tree level.
The final step to reach the objective is to install the company tree
view in a new tab of the company tab view. We do this by modifying the
Company.tab.pane view as below :
tabs 'Company.tab.pane',
  views:['Company.pane','Company.tree','Traceable.pane']
We declare another tab in the tab view.
We can now test the result.
Play around with the tree and with the tables. You will see that everything is always kept synchronized; we have a true MVC architecture.
Composite tree levels
There are situations where simple tree levels are just not enough to define complex tree structures. Imagine that you want to display, under each team, a subtree for the projects managed by a team and a subtree for the team members.
Jspresso allows you aggregate the 2 simple tree levels (projects and team members) into a composite tree level and make this composite tree level the child level of the team tree level.
Other types of views
Jspresso offers many other types of views to build arbitrarily complex views to enhance the user experience. We won't describe theme in detail in this tutorial but you can refer to the view descriptor reference section for a complete description. Fell free also to browse the complete sources of the HR sample application while running it to see them in action. Just remember that all the other standard view descriptors follow the exact same principles we have discovered in this section : assemble the descriptors to design what you need and let the framework work for you.
It's time now to get our application really up and running.
Wiring the application
As we saw it at the beginning of this tutorial, a Jspresso based application is cleanly organized into 4 separate layers :
The model layer that contains the rich domain business objects
The view layer that binds to and displays the model
The backend layer which is responsible for handling the backend state and operations providing :
domain business objects manipulation and persistence
transaction management
rich application session that handles domain state, long running user transactions (independent from actual technical transactions and persistence) and user management (identification, credentials, authorizations, ...)
actions backend part (domain services triggering, unit of work for handling in-memory transaction-aware domain state)
The frontend layer which is responsible for handling the user interactions :
user log in
application starting and access to the various registered workspaces and modules
construction and display of the views
actions frontend part (wizards, success and error notifications, decisions, ...)
We have already covered in details the model and view layers in this tutorial. This section will address the backend and frontend layers.
Configuring the backend layer
The backend controller
The backend layer is organized around the backend controller. The backend controller is the conductor of all backend operations. As of now, Jspresso provides one concrete implementation of a backend controller : the Hibernate backend controller. This implementation provides all the backend management described above using hibernate and the hibernate spring stack (using hibernate and transaction templates). We will see later on how the spring hibernate stack is used when dealing with actions.
As for model.groovy and view.groovy, the archetype has generated a
ready to use Spring configuration file for the backend named
backend.groovy. Here is what it looks like :
// Implement your application backend here using the SJS DSL.
And the good news is that there is nothing to code here for a standard usage.
The backend configuration
The archetype also generated the config.xml Spring configuration file
where we can define everything related to the deployment environment.
The default configuration generated by the archetype uses HSQL DB as the
database. In a production environment, you will adapt it to your
targeted database. Although you could also define those configurations
in SJS, there would not be much added value. So the Jspresso archetype
does not generate any equivalent SJS file.
Here is the file commented :
<bean id="dataSource" class="org.apache.commons.dbcp2.BasicDataSource" destroy-method="close">
  <property name="driverClassName" value="org.hsqldb.jdbcDriver" />
  <property name="url" value="jdbc:hsqldb:mem:hrsample" />
  <property name="username" value="sa" />
  <property name="password" value="" />
</bean>

<bean id="hibernateSessionFactory" parent="abstractHibernateSessionFactory">
  <property name="hibernateProperties">
    <props>
      <prop key="hibernate.query.substitutions">true 1, false 0, yes 'Y', no 'N'</prop>
      <prop key="hibernate.dialect">org.hibernate.dialect.HSQLDialect</prop>
      <prop key="hibernate.order_updates">true</prop>
      <prop key="hibernate.max_fetch_depth">1</prop>
      <prop key="hibernate.default_batch_fetch_size">8</prop>
      <prop key="hibernate.jdbc.batch_versioned_data">true</prop>
      <prop key="hibernate.jdbc.use_streams_for_binary">true</prop>
      <prop key="hibernate.cache.region_prefix">hibernate.test</prop>
      <prop
        key="hibernate.cache.provider_class">org.hibernate.cache.EhCacheProvider</prop>
      <prop key="hibernate.hbm2ddl.auto">update</prop>
      <prop key="hibernate.jdbc.batch_size">0</prop>
    </props>
  </property>
  <property name="mappingLocations">
    <list>
      <value>classpath*:org/jspresso/hrsample/**/*.hbm.xml</value>
    </list>
  </property>
</bean>
We configure the data source that will be used in this environment. In
the development phase, we will use the well known HSQL DB in-memory
database. HSQL DB will freshly start every-time the application itself
starts and instantiate the data source. We configures the JDBC URL to
use the in-memory database. We configure the hibernate session factory
with sensible values inheriting from the one brought by the hibernate
standard configuration. For a complete reference of the meaning of the
different parameters, please either refer to the hibernate or spring
reference documentation. The most important here is that we tell
hibernate to talk to the database using the HSQL DB dialect. Last but
not least, since we configure a development environment, we tell
hibernate to update (in our case create) the DB schema when starting so
that our in memory HSQL DB gets populated with a fresh, empty,
domain-synchronized schema. We instruct hibernate to load the mapping
files from resources located in any org.jspresso.hrsample subpackage.
Without any extra configuration, we actually have a fully functional hibernate aware backend relying on our domain model.
The next phase consists in setting up the configuration for the frontend.
Configuring the frontend layer
In this section, we will go through the different steps to finally have our application up and running.
The frontend controller
The minimal frontend configuration requires the definition of the frontend controller. Although the backend controller is quite generic and requires no special parametrization most of the application final assembling is done in the frontend.
The archetype generated a default frontend.groovy in the
org.jspresso.hrsample.frontend package that contains a minimal
frontend controller definition. Here is what it contains :
// Implement your application frontend here using the SJS DSL.

/*
 * The workspaces and modules
 */

// Describe your workspaces and modules here.

controller 'hrsample.name',
  icon:'icon.png',
  context:'hrsample',
  language:'fr',
  workspaces:[/*Reference your workspaces here.*/]
We declare our application frontend controller. We define the name (in fact the I18N key) of the controller, or more generally of the application. It will be used as the frame title in the case of the swing controller. We define the icon of the controller, or more generally of the application. It will be used as the frame icon in the case of the swing controller. We tell the controller the JAAS login context to use. We will go later into details regarding Jspresso and security. Jspresso uses the locale of the logged-in user to translate the application. But before the user has actually logged-in, or for anonymous access, we still need to tell Jspresso which locale to use at least to translate the login dialog ! Whenever this property is omitted, the locale of the client machine (or browser language, depending on the used GUI technology) will be used.
The application is ready to be assembled.
Securing the application access : Authentication
Securing an application is a matter of handling :
Authentication (is the user the one he pretends to be ?).
Authorization (is the user granted access to what he's trying to achieve ?).
Both of these topics are extensively covered by the Jspresso framework. This chapter covers the authentication part.
Authentication in a Jspresso application relies on JAAS (Java Authentication and Authorization Service). We will not go into details about JAAS since there are excellent tutorials on the web (this one for instance). Jspresso provides all the necessary plumbing to seamlessly integrate any JAAS login module and as of this writing, there are 3 login modules that come with the framework :
The development login module which does not require any backend and is perfectly suited for development.
The LDAP login module which authenticates the user against an LDAP directory.
The JDBC login module which authenticates the user against a relational database.
You may find many other, freely available, JAAS login modules to meet your needs (JDBC, ascii encrypted file, ...). In this section, we will secure our application with the development login module but the exact same principles (except for the module configuration itself) can be applied for others.
As for any JAAS based login module, we will need a JAAS configuration.
The archetype created the hrsample/conf/jaas.config that registers the
development login module. Here is the generated jaas.config file
detailed :
/** Login Configuration for the application **/

hrsample {
   org.jspresso.framework.security.auth.spi.DevelopmentLoginModule required
       user=demo
       password=demo
       roles="administrator"
       custom.language=en;
};
The name of the login context that we use for the application as
registered in the frontend controller. We
reference the development login module class. The user name the
development will check (here "demo"). The user password the development
will check (here "demo"). The comma-separated list of roles (profiles)
the logged-in user will be assigned (here "administrator"). These roles
will be checked against when dealing with authorizations. Any custom
property we want to store in the user principal; these properties are
kept in a map. Here, we store the custom language property as being
English. the language property is a well-known property that will be
used by the frontend and backend controllers to apply the correct locale
for GUI and messages.As you can see, this login module is absolutely not
suited for production purpose but it is perfect for development since
you will be able to assign different locales to the logged-in user (and
thus test for the I18N of the application), or vary the granted roles
(and thus test for the authorization policies you have set up).
Moreover, you can feed the user principal with an arbitrary list of
custom properties your application may need to refer to.
Of course, other login modules will fetch everything from a persistent
store and configuring them will be a matter of customizing how the user
password will be checked and how the user data will be retrieved. But
the key point is that changing the authorization method will just be a
matter of changing the jaas.config file; all the other steps we will
go through know will remain unchanged.
The application startup
Starting up a Jspresso application actually depends on the GUI
technology used. Jspresso does the glue between the underlying
technology and the application code. All the developer has to do is to
declare the Spring context to be used when launching the application. It
is done in a startup class that inherits a base class that depends on
the used GUI technology. Hopefully, the archetype generated all the
needed startup classes in the hrsample/startup project module.
Note
The different Spring contexts that are to be referenced in the startup classes depending on the frontend technology are actually defined in the standard Spring bootstrap configuration file
beanRefFactory.xml. Again, this file was generated and doesn't need to be modified for standard usage. For large applications, you may want to split the generatedmodel.groovy,view.groovy,frontend.groovyandbackend.groovySJS source files into smaller parts. In that case, you need to reflect those splits into the bootstrapapplication.groovyfile that bootstraps the SJS compilation.
Even though you won't have to modify startup classes, take some time to
have a look at what was generated. For instance, you may open the
SwingApplicationStartup.java class that is used to lauch the Swing
version of the application.
Here is the code commented :
package org.jspresso.hrsample.startup.swing;

import org.jspresso.framework.application.startup.swing.SwingStartup;

/**
 * Swing application startup class.
 */
public class SwingApplicationStartup extends SwingStartup {

  /**
   * Returns the "hrsample-swing-context" value.
   * <p>
   * {@inheritDoc}
   */
  @Override
  protected String getApplicationContextKey() {
    return "hrsample-swing-context";
  }
}
We inherit from SwingStartup since we are starting the application in
Swing mode.
Our swing application will use the hrsample-swing-context entry we
defined in the bootstrap beanRefFactory.xml file.
This startup class will be used by a generic swing launcher -
SwingLauncher - that is declared as the main class of the Eclipse
launch configuration we have imported in our Eclipse workspace.
You can launch the appication now. You should have a splash screen
popping up, then a login dialog appears and once the user has logged-in
(demo/demo as per the jaas.config file), the entire application is
translated in its locale; notice that until the user has actually logged
in, the frontend controller startup locale applies (here, french).
Of course, this is a very basic launch for a pretty useless
application... But to make sure that our entities are actually
registered in hibernate, let's activate the debug mode for the hbm2dll
tool (remember that we are in the development phase and that we told
hibernate to regenerate the database schema in HSQL DB at startup); edit
the log4j.properties file at the root of the classpath and uncomment
the following line :
#log4j.logger.org.hibernate.tool.hbm2ddl=DEBUG
You should obtain the following traces in the console :
INFO  org.hibernate.tool.hbm2ddl.SchemaUpdate : Running hbm2ddl schema update
INFO  org.hibernate.tool.hbm2ddl.SchemaUpdate : fetching database metadata
INFO  org.hibernate.tool.hbm2ddl.SchemaUpdate : updating schema
INFO  org.hibernate.tool.hbm2ddl.DatabaseMetadata : table not found: CITY
...
DEBUG org.hibernate.tool.hbm2ddl.SchemaUpdate : create table CITY (ID varchar(36) not null,
             VERSION integer not null,
             ZIP varchar(10),
             NAME varchar(64) not null,
             primary key (ID))
...
DEBUG org.hibernate.tool.hbm2ddl.SchemaUpdate : alter table COMPANY
             add constraint FK6372C85DBA3A8814
             foreign key (CONTACT_CITY_ID)
             references CITY
...
INFO  org.hibernate.tool.hbm2ddl.SchemaUpdate : schema update complete
We will see later how to take care of the profiles (roles) authorizations and how the framework will handle it for you with very little configuration. But before getting there, we need to install some application workspaces and modules.
Creating and registering application workspaces and modules
Before getting further in this section, let's first agree on what application workspaces and modules are. Jspresso defines an application module as a projection of the domain model offering services. It is an autonomous part of the application that can be registered in workspaces which in turn are registered in the frontend controller to make them available to the end-user. As of this writing, the built-in frontend controllers (Swing, qooxdoo and Flex) create a main application frame and give access to the registered workspaces through a menu. Whenever a workspace is opened, the workspace modules structure is displayed.
Since we talk about module structure, let's explore it. A module is basically a tree structure with nested sub-modules (refer to the modules class diagram to better understand it). The workspace is the root of this tree structure and each workspace registered module (and sub-module) is an actual application entry point.
There are 3 different categories of modules :
Simple module : it offers a view (and its attached services) on an arbitrary model (if any).
Bean module : it offers a view (and its attached services) on a bean (maybe an entity but it is not mandatory; it can be any java bean). The contained java bean can be accessed (get / set) at any time and the projected view model gets updated accordingly.
Bean collection module : it offers a view (and its attached services) on a collection of beans (maybe a collection of entities but it is not mandatory; it can be any collection of java beans). The contained java beans collection can be accessed (get / set) at any time and the projected view model gets updated accordingly.
The master data management workspace
The first workspace we will create and register is the master data management workspace. It will offer simple C.R.U.D. (Create Retrieve Update Delete) services on the application master data (actually the cities). As always, Jspresso is offering a large range of built-in, ready to assemble components to achieve this.
The cities bean collection module
The first module we will build is a bean collection module (actually a filterable one) that offers the end user all the standard operations on the cities entities. Let's have a look to the workspace and module definition and registration.
Open the frontend.groovy SJS source file and add the following :
workspace('masterdata.workspace',
  icon:'masterdata-48x48.png') {
  filterModule('masterdata.cities.module',
    component:'City')
}

controller 'hrsample.name',
  ...
  workspaces:['masterdata.workspace']
We declare our new master data management workspace. We assign the list
of modules belonging to this new workspace. The list contains one module
which is the cities C.R.U.D. module. We declare the cities CRUD module.
We configure the module by referencing the City entity as being the
content element of this C.R.U.D. module. We register the master data
management workspace in the existing frontend controller.
You might notice in the fragment above that there are actually very few directives needed to get a fully functionning C.R.U.D. module on an entity. Most of the code deals with names, descriptions and icons to obtain a nice looking GUI. Of course, there are plenty of customizations you can achieve to meet the actual end-user requirements (customize the view on the bean collection, the filter, the offered services, ...), but none of them is required until you actually want to change the default sensible values.
We are now ready to see the first workspace in action by launching the application. The master data workspace will be made available in the application frame workspaces menu. Don't hesitate to play with it, create some cities, save them, query them applying a filter, zoom on a selected one to edit it in a more convenient form, reset the list, ... And if you turn on logging for the executed SQL, you will see all your statements transmitted to the backend database. The screenshots below captures some of the actions we have just talked about.
1- We have just lauched the module.

|
2- We are saving 3 cities we've just
created.
|
3- We are querying the database applying a
filter.

|
4- We are going to edit one of the cities individually
in a form.
|
5- We have installed one of the city in the module tree
and we edit it.
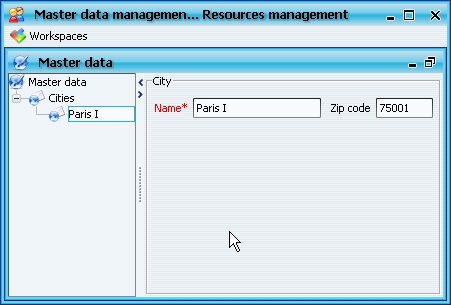
|
6- We reset the module content (the database, of
course, still contains the data).

|
Next step will consist in structuring a little bit more the module tree.
Structuring the modules hierarchy
There might be situations when you would like to structure a little bit more how your application modules are organized. This implies, for instance, grouping modules into categories and sub-categories. Modules grouping can be achieved by using basic modules that structure the workspace module hierarchy.
Consider the following situation where you want to group your master data management in sub-categories like "geography", "finance", and so on... Of course, our cities management module should go in the geography category. This is quite straightforward to declare; look at how we slightly modify the workspace description in the following SJS fragment :
workspace('masterdata.workspace',
  icon:'masterdata-48x48.png') {
  nodeModule('masterdata.geography.module',
    icon:'geography-48x48.png') {
    filterModule('masterdata.cities.module',
      component:'City'
  }
}
We are inserting the category simple module. It is a viewless module, so the only thing we have to configure is its name, description and icon. We transfer the existing cities management module as a child (sub-module) of the above geography module.
This type of taxonomy can be arbitrarily deep since you can in turn put categories modules as sub-modules of others.
Re-launching the master data management workspace, we wil see our new intermediate geography simple module :
Introduction to bean modules
As of now, we have used a simple module and a filtered bean collection module. As introduced at the beginning of the section, the third type of module is the bean module. This type of module, as explained before, gives a view (and services) on a single business object.
If you look back to the screenshots of the master data management workspace, you may notice that we haved used such a module (screenshot 5) even without knowing it ! This is because one of the standard bean collection module actions creates a bean module behind the scene and dynamically installs it in the module hierarchy as a sub-module. Of course, in this case, it is pretty useless since it doesn't offer any extra functionality beyond the ones offered by its parent. But don't forget that you may change a lot of things to meet any special requirement.
As a demonstration of this (but actually not really more useful), let's customize the view of this bean module to offer a save and reload service on the single displayed city.
Beforehand, we are going to declare the new city component view in the
view.groovy :
form('City.module.view',
  parent:'decoratedView'
  columnCount:1) {
  actionMap {
    actionList('FILE'){
      action(ref:'saveModuleObjectFrontAction')
      action(ref:'reloadModuleObjectFrontAction')
    }
  }
}
For the sake of modifying the view layout, we organize the fields in 1 column. We assign a new action map to this view. Instead of what we did previously when referencing a built-in action map, we will create a brand new one. An action map is a list of action lists; so let's create one. We register the standard built-in save action. We register the standard built-in reload action.
Once the customized view is declared, we need to register it in the bean collection module as follows :
workspace('masterdata.workspace',
  icon:'masterdata-48x48.png') {
  nodeModule('masterdata.geography.module',
    icon:'geography-48x48.png') {
    filterModule('masterdata.cities.module',
      component:'City',
      detailView:'City.module.view'
      )
  }
}
We register the new city view as being the view to use when displaying a single city.
We are now ready to re-open the workspace, create a new city and display it individually :
We have seen here one usage of a bean module that is implicitly created and installed using an action registered on a bean collection module.
Although this is actually one of the major usage of this type of module,
another usage consists in giving access to a session singleton-like
component. For instance, you could explicitly install a bean module to
allow the logged-in user to edit his personal informations. In that
particular case, the logged-in user account would be used as the module
object of the account editing module. The question left is how to
initialize the user account as the bean module object? Every Jspresso
application module provides a startup hook that gets triggered when the
module is first selected by the end-user. So in this case, you would
code a custom startup action to retrieve the logged-in user informations
from whatever backing store (LDAP for instance), wrap them in a java
bean and set the result as the bean module object. This startup action
is then registered in the module description as its startupAction.
This somewhat advanced topic is beyond the scope of this section, but
read further to learn how to write custom actions and remember that you
can register them as being startup-triggered at different places in a
Jspresso application i.e. controller (when the application starts)
workspace (when the workspace is opened for the first time) and modules
(when the module is first selected).
Improving the development lifecycle : setting-up test data on startup
One thing that you might have noticed is that the usage of an in-memory development database leads to a waste of time creating sample data to test the different modules and services. A good practice is to ease the developer job by setting-up test data each time the application starts. There are actually different ways to achieve that ranging from launching a SQL script when starting the application to registering a startup triggered action in the controller; but one of the preferred, more robust and less intrusive way to do it is to write a dedicated startup class that inherits from the default one and that persists a complete test domain before actually starting the frontend controller. This way, you directly manipulate your domain objects, your business rules are enforced and your domain structure is checked at compile time; you then basically stay away from seeing your test data becoming obsolete after a major refactoring and you keep this setup agnostic of the implementation details (nature of the targeted database for instance).
It is also a good idea to centralize the test data production in a
separate class that can be used by the various development startup class
thus avoiding un-needed duplication of code. Jspresso offers an abstract
base class for this task - AbstractTestDataPersister - on which you
simply have to override the persistTestData() method.
The Jspresso archetype generated a skeleton for you that you have to
complement with your test data :
org.jspresso.hrsample.development.TestDataPersister. You also imported
a launch configuration that allows you to start the application with
test data in place.
So let's write this simple test data production class for the HR application :
package org.jspresso.hrsample.development;

import java.text.ParseException;
import java.text.SimpleDateFormat;

import org.jspresso.framework.application.startup.development.AbstractTestDataPersister;
import org.springframework.beans.factory.BeanFactory;

import org.jspresso.hrsample.model.City;
import org.jspresso.hrsample.model.Company;
import org.jspresso.hrsample.model.Department;
import org.jspresso.hrsample.model.Employee;
import org.jspresso.hrsample.model.Team;

/**
 * Persists some test data for the HR sample application.
 */
public class TestDataPersister extends AbstractTestDataPersister {

  /**
   * Constructs a new <code>TestDataPersister</code> instance.
   *
   * @param beanFactory
   *            the spring bean factory to use.
   */
  public TestDataPersister(BeanFactory beanFactory) {
    super(beanFactory);
  }

  /**
   * Creates some test data using the passed in Spring application context.
   */
  @Override
  public void persistTestData() {

    // Cities
    City paris = createCity("Paris I", "75001");
    City suresnes = createCity("Suresnes", "92150");
    City evry = createCity("Evry", "91000");

    // Company
    Company design2see = createCompany("Design2See",
        "123 avenue de la Liberté", paris, "[email protected]",
        "+33 123 456 000");

    // Employees
    Employee johnDoe = createEmployee("M", "Doe", "John",
        "12 allée du Chien qui Fume", evry, "[email protected]",
        "+33 1 152 368 984", "02/05/1972", "03/08/2005", "1523698754",
        design2see);

    Employee mikeDen = createEmployee("M", "Den", "Mike",
        "26 rue de la Pie qui Chante", suresnes, "[email protected]",
        "+33 1 968 846 398", "05/07/1970", "01/03/2004", "1859637461",
        design2see);

    Employee evaGreen = createEmployee("F", "Green", "Eva",
        "68 rue de l'Eléphant Vert", suresnes, "[email protected]",
        "+33 1 958 536 972", "10/08/1977", "06/04/2002", "2856752387",
        design2see);

    Employee gloriaSan = createEmployee("F", "San", "Gloria",
        "13 avenue du Poisson Enragé", evry, "[email protected]",
        "+33 1 956 367 412", "09/01/1969", "03/01/2006", "2597853274",
        design2see);

    Employee mariaTrulli = createEmployee("F", "Trulli", "Maria",
        "20 avenue du Crocodile Marteau", evry, "[email protected]",
        "+33 1 868 745 369", "01/02/1976", "03/10/2006", "2325985423",
        design2see);

    Employee isabelleMartin = createEmployee("F", "Martin", "Isabelle",
        "20 allée de la Gazelle Sauteuse", evry,
        "[email protected]", "+33 1 698 256 365", "04/07/1970",
        "12/06/2001", "2652398751", design2see);

    // Departments and teams.
    Department hrDepartment = createDepartment("Human Resources", "HR-000",
        "124 avenue de la Liberté", paris, "[email protected]",
        "+33 123 456 100", design2see, johnDoe);

    Team hr001Team = createTeam("HR 001 Team", "HR-001",
        "124 avenue de la Liberté", paris, "[email protected]",
        "+33 123 456 101", hrDepartment, mikeDen);
    hr001Team.addToTeamMembers(johnDoe);
    hr001Team.addToTeamMembers(mikeDen);

    Team hr002Team = createTeam("HR 002 Team", "HR-002",
        "124 avenue de la Liberté", paris, "[email protected]",
        "+33 123 456 102", hrDepartment, evaGreen);
    hr002Team.addToTeamMembers(johnDoe);
    hr002Team.addToTeamMembers(evaGreen);

    Department itDepartment = createDepartment("Information Technology",
        "IT-000", "125 avenue de la Liberté", paris, "[email protected]",
        "+33 123 456 200", design2see, gloriaSan);

    Team it001Team = createTeam("IT 001 Team", "IT-001",
        "125 avenue de la Liberté", paris, "[email protected]",
        "+33 123 456 201", itDepartment, mariaTrulli);
    it001Team.addToTeamMembers(gloriaSan);
    it001Team.addToTeamMembers(mariaTrulli);

    Team it002Team = createTeam("IT 002 Team", "IT-002",
        "125 avenue de la Liberté", paris, "[email protected]",
        "+33 123 456 202", itDepartment, isabelleMartin);
    it002Team.addToTeamMembers(gloriaSan);
    it002Team.addToTeamMembers(isabelleMartin);

    saveOrUpdate(design2see);
  }

  private City createCity(String name, String zip) {
    City city = createEntityInstance(City.class);
    city.setName(name);
    city.setZip(zip);
    saveOrUpdate(city);
    return city;
  }

  private Company createCompany(String name, String address, City city,
      String email, String phone) {
    Company company = createEntityInstance(Company.class);
    company.setName(name);
    company.getContact().setAddress(address);
    company.getContact().setCity(city);
    company.getContact().setEmail(email);
    company.getContact().setPhone(phone);
    return company;
  }

  private Department createDepartment(String name, String ouId, String address,
      City city, String email, String phone, Company company, Employee manager) {
    Department department = createEntityInstance(Department.class);
    department.setName(name);
    department.setOuId(ouId);
    department.getContact().setAddress(address);
    department.getContact().setCity(city);
    department.getContact().setEmail(email);
    department.getContact().setPhone(phone);
    department.setCompany(company);
    department.setManager(manager);
    return department;
  }

  private Team createTeam(String name, String ouId, String address, City city,
      String email, String phone, Department department, Employee manager) {
    Team team = createEntityInstance(Team.class);
    team.setName(name);
    team.setOuId(ouId);
    team.getContact().setAddress(address);
    team.getContact().setCity(city);
    team.getContact().setEmail(email);
    team.getContact().setPhone(phone);
    team.setDepartment(department);
    team.setManager(manager);
    return team;
  }

  private Employee createEmployee(String gender, String name, String firstName,
      String address, City city, String email, String phone, String birthDate,
      String hireDate, String ssn, Company company) {
    SimpleDateFormat df = new SimpleDateFormat("DD/MM/yyyy");

    Employee employee = createEntityInstance(Employee.class);
    employee.setGender(gender);
    employee.setName(name);
    employee.setFirstName(firstName);
    employee.getContact().setAddress(address);
    employee.getContact().setCity(city);
    employee.getContact().setEmail(email);
    employee.getContact().setPhone(phone);
    try {
      employee.setBirthDate(df.parse(birthDate));
    } catch (ParseException ex) {
      ex.printStackTrace(System.err);
    }
    try {
      employee.setHireDate(df.parse(hireDate));
    } catch (ParseException ex) {
      ex.printStackTrace(System.err);
    }
    employee.setSsn(ssn);
    employee.setCompany(company);
    return employee;
  }
}
As you can see in the code above, we have set up the test data by simply creating and composing some domain entities in plain java.
You can now have a look to the Swing development startup class
(org.jspresso.hrsample.startup.swing.development.SwingDevApplicationStartup)
that already exists in your project code base and that is used by the
development launch configuration :
package org.jspresso.hrsample.startup.swing.development;

import org.jspresso.hrsample.development.TestDataPersister;
import org.jspresso.hrsample.startup.swing.SwingApplicationStartup;

/**
 * Swing development application startup class.
 */
public class SwingDevApplicationStartup extends SwingApplicationStartup {

  /**
   * Sets up some test data before actually starting.
   * <p>
   * {@inheritDoc}
   */
  @Override
  public void start() {
    new TestDataPersister(getApplicationContext()).persistTestData();
    super.start();
  }
}
Before actually launching the application, we persist the test data produced by the test data persister.
Developing the remaining workspaces
In this section, we will create and register the remaining workspaces and modules to work on the employees and the organization design. We will reuse the concepts that we've discussed when dealing with the master data management module and adapt them to the corresponding domain windows.
The employees management workspace
As for the cities module, the employees management module will offer CRUD operations. For the sake of simplicity, this module will not be linked to a particular company and thus allows employees to be managed for any existing company in the database. Since it would be too cumbersome to include all the source code in this tutorial and since there is hardly anything new, we will only take some screenshots of the resulting GUI; but feel free to have a look to the spring definition files and to modify them to get a deeper understanding of how the workspace is built (don't be afraid, it's only a matter of ~100 SJS lines).
So let's navigate through the employees workspace :
1- We have just launched the module.
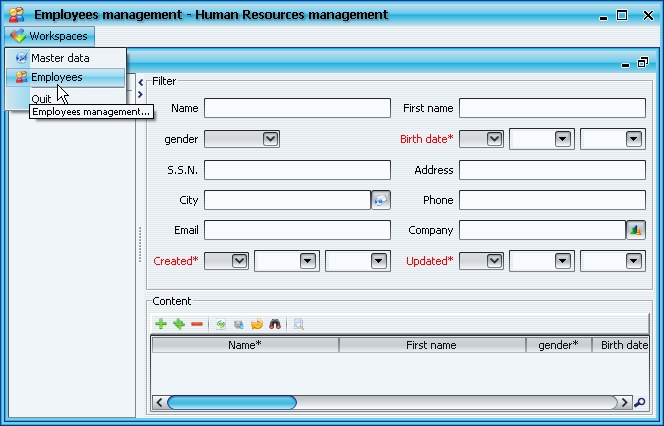
|
2- We are querying employees filtering their address
city and birth date.
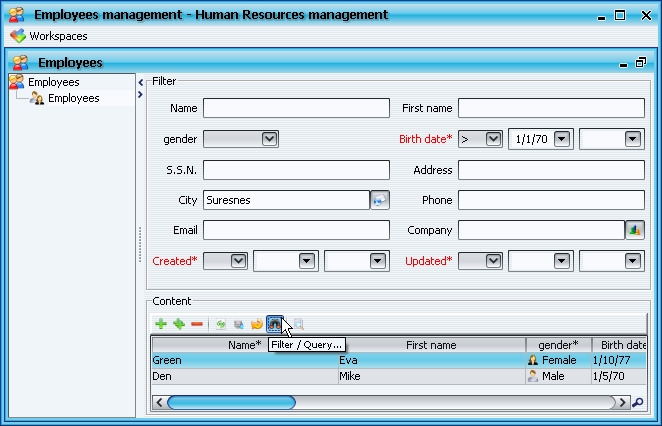
|
3- We are editing a single employee in a
form.
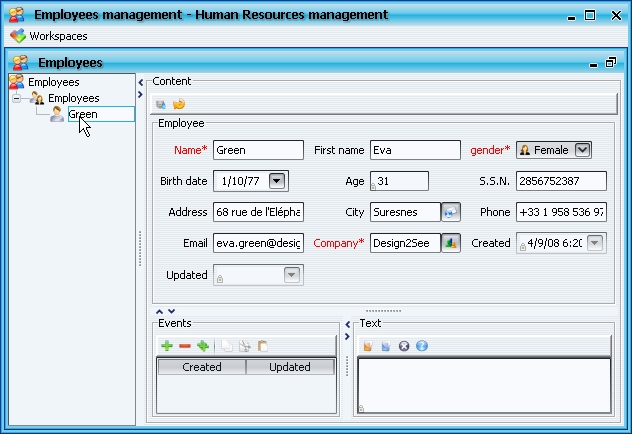
|
4- This form gives access to the events of the edited
employee.
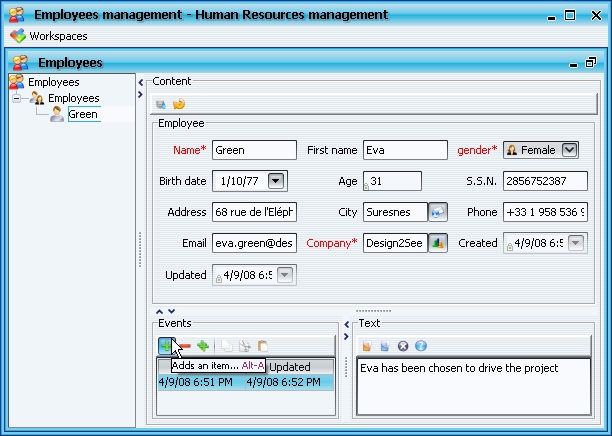
|
5- We can copy an event entity.
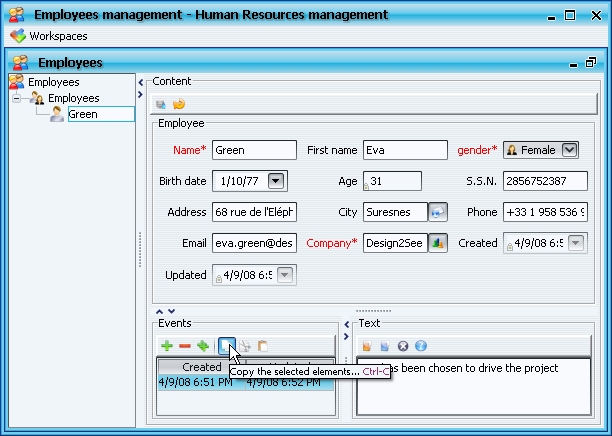
|
6- And paste it to another employee.
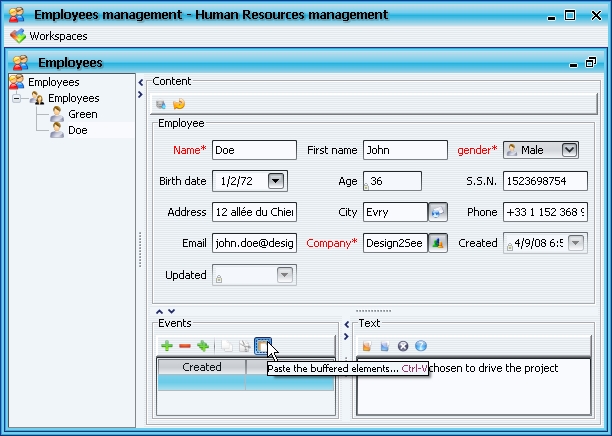
|
7- Or maybe read an event text from a file.

|
8- And even save the event text to a file.
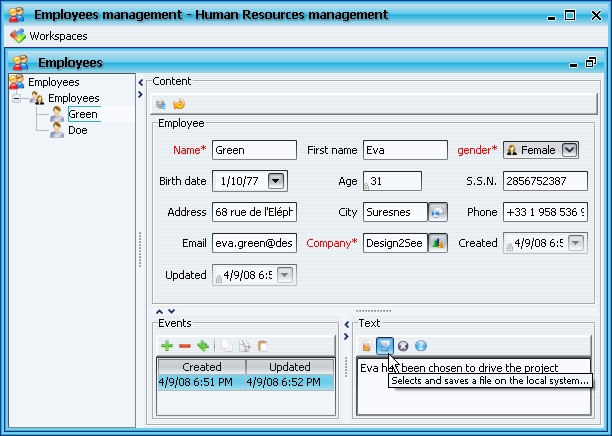
|
The organization management workspace
As for the employee workspace, getting a fully functional workspace to be able to edit a company organization is only a matter of assembling things that we've already gone through. We will reuse the company view we've created in the previous sections as the company bean module view. This workspace will be made of several modules. One module will allow to edit the company structure in terms of organizational units (departments and teams), and a second module will allow for managing the teams members.
So let's navigate through the organization workspace.
Managing companies, departments and teams
You will find below the screenshots of companies management module; they are somehow familiar now.
1- We have just launched the module.

|
2- We are querying companies without any
filter.
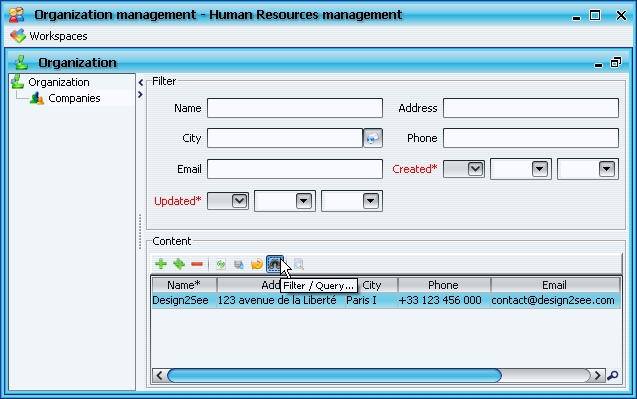
|
3- We are editing a single company in a
form.
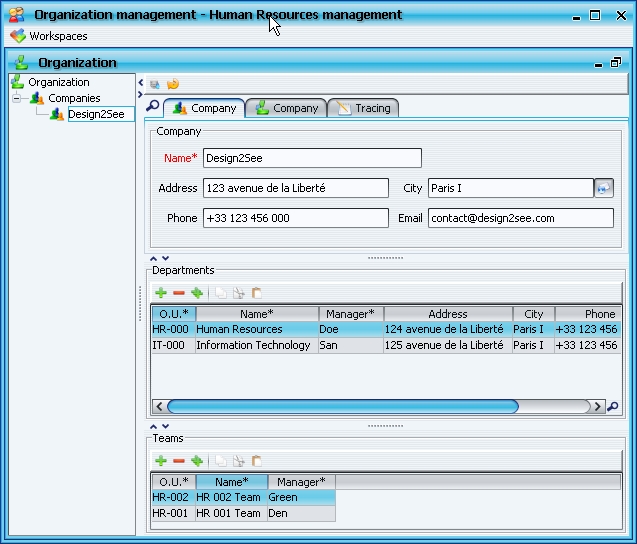
|
4- The second tab in the company view gives a tree
overview of the current company structure.
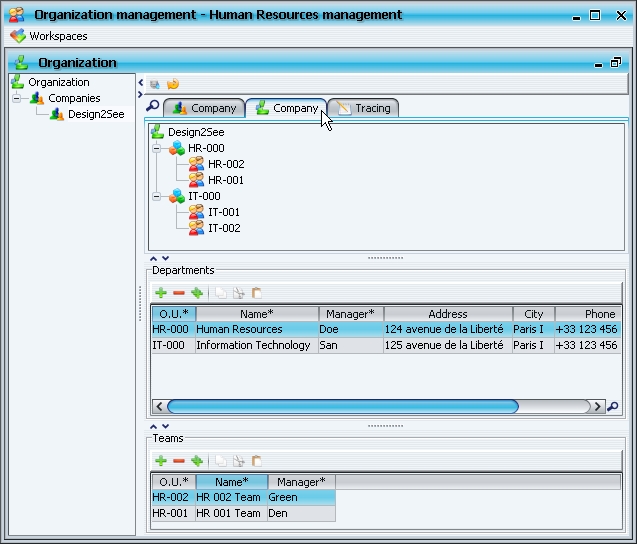
|
Within this module, there is a business rule that needs some
investigation. Remember the OrganizationalUnit abstract entity
(Department and Team entities inherit from it). We have defined a
manager relationship to the Employee entity that can be visualized
in the screenshots above (look at the manager table columns). By
default, nothing prevents the end user from selecting a manager that
belongs to another company than the one the organizational unit belongs
to. So we need to enforce the fact that a manager must belong to the
same company than the team or department (s)he manages.
There are several steps to enforce this business rule and ease the end-user job :
A department is directly linked to a company but a team is not; a team belongs to a company through the department it's part of. This is quite a good design regarding the model normalization but we might want to enrich the API of the
OrganisationalUnitentity to be able to get its company wether it's aTeamor aDepartment. It is the perfect situation where we need to implement a computedcompanyproperty held by theOrganisationalUnitentity.We need to enforce the company check business rule when setting the manager property on an
OrganisationalUnitentity. This will ensure that any update of the manager property (from the GUI or from any other headless interface) will not corrupt the integrity of theOrganisationalUnitentity. This is easily implemented using a property pre-processor.We must ease the end-user job in the GUI by pre-initializing the employee filter with the organizational unit company in the manager LOV and auto-completion feature.
Let's have a look to the changes made to the application.
In the model.groovy SJS source file :
Entity('OrganizationalUnit',
    ...
    processor :'OrganizationalUnitPropertyProcessors',
    extension :'OrganizationalUnitExtension') {
  ...
  reference 'manager', id:'OrganizationalUnit-manager', ref:'Employee', mandatory:true,
           processors:['ManagerProcessor'], initializationMapping:['company':'company']
  reference 'company', ref:'Company', computed:true
}
We declare the class enclosing all the OrganizationalUnit property
processors. Its package is determined by convention based on the current
namespace, i.e.
org.jspresso.hrsample.model.processor.OrganizationalUnitPropertyProcessors.
We declare the class that is used to compute all derived properties of
the OrganizationalUnit entiity. Its package is determined by
convention based on the current namespace, i.e.
org.jspresso.hrsample.model.extension.OrganizationalUnitExtension. We
register an integrity processor that will be triggered when a change
occurs on the organizational unit manager. By convention, it's an
internal static class of OrganizationalUnitPropertyProcessors. We tell
the framework that filter based on the manager reference property should
pre-initialize its value with the following mapping
OrganistionalUnit.company -> Employee.company. This is a feature
that we have not seen yet and that is very useful to pre-enforce
business rules on the GUI side. LOV and auto-completion will both
benefit from this customization. We declare a new company computed
property on the organizational unit entity. The delegate will handle the
company computing in case of a department or a team. The property is
computed by the OrganizationalUnitExtension class.
Since we added a property to the OrganizationalUnit entity, we need to
re-generate it so that the accessors are available in the entity
interface (mvn
compile then refresh in Eclipse).
As before when dealing with property processors and computed properties, we need to implement the java delegates.
We create the
org.jspresso.hrsample.model.extension.OrganizationalUnitExtension
class to implement the computed properties on the OrganistionalUnit
entity; this is the exact same design as when we dealt with computing
the age of the Employee entity :
package org.jspresso.hrsample.model.extension;

import org.jspresso.framework.model.component.AbstractComponentExtension;
import org.jspresso.hrsample.model.Company;
import org.jspresso.hrsample.model.Department;
import org.jspresso.hrsample.model.OrganizationalUnit;
import org.jspresso.hrsample.model.Team;

/**
 * Helper class computing extended properties for OrganizationalUnit entity.
 */
public class OrganizationalUnitExtension extends
    AbstractComponentExtension<OrganizationalUnit> {

  /**
   * Constructs a new <code>OrganizationalUnitExtension</code> instance.
   *
   * @param organizationalUnit
   *            The extended OrganizationalUnit instance.
   */
  public OrganizationalUnitExtension(OrganizationalUnit organizationalUnit) {
    super(organizationalUnit);
  }

  /**
   * Computes the company this organizational unit is attached to.
   *
   * @return the company this organizational unit is attached to. If the
   *         organizational unit is a department, returns the departments
   *         company; if this organizational unit is a team, then we must
   *         navigate to the enclosing department to get its team.
   */
  public Company getCompany() {
    if (getComponent() instanceof Team
        && ((Team) getComponent()).getDepartment() != null) {
      return ((Team) getComponent()).getDepartment().getCompany();
    } else if (getComponent() instanceof Department) {
      return ((Department) getComponent()).getCompany();
    }
    return null;
  }
}
A pretty simple implementation that deals with concrete sublasses of
OrganizationalUnit.Finally, we create the
org.jspresso.hrsample.model.processor.OrganizationalUnitPropertyProcessors
that holds all property processors of the OrganistionalUnit entity;
this is the exact same design as when we dealt with checking the birth
date of the Employee entity :
package org.jspresso.hrsample.model.processor;

import org.jspresso.framework.util.bean.integrity.EmptyPropertyProcessor;
import org.jspresso.framework.util.bean.integrity.IntegrityException;
import org.jspresso.hrsample.model.Employee;
import org.jspresso.hrsample.model.OrganizationalUnit;

/**
 * OrganizationalUnit property processors.
 */
public class OrganizationalUnitPropertyProcessors {

  /**
   * Manager property processor.
   */
  public static class ManagerProcessor extends
      EmptyPropertyProcessor<OrganizationalUnit, Employee> {

    /**
     * Checks that the manager belongs to the same company as the managed
     * OrganizationalUnit.
     * <p>
     * {@inheritDoc}
     */
    @Override
    public void preprocessSetter(OrganizationalUnit organizationalUnit,
        Employee newManager) {
      if (newManager == null || newManager.getCompany() == null
          || !newManager.getCompany().equals(organizationalUnit.getCompany())) {
        throw new IntegrityException(
            "A manager must belong to the same company as its managed organizational unit.",
            "manager.company.invalid");
      }
    }
  }
}
Following the recommended design for property processors, the manager
property processor is implemented as an inner class of the enclosing
OrganizationalUnitPropertyProcessors class. We need to pre-process the
manager setter to check for the manager company to be the same as the
company of the managed organizational unit. Whenever the rule is
violated, an integrity exception is thrown.Let's see a few screenshots
to demonstrate the result of the various changes we did. For the sake of
the demonstration, we have created a second company along with an
employee and we will try to use this new employee as the manager in one
of the sample departments.
1- We will trigger the list of value to change the
department manager.

|
2- The LOV dialog opens with a pre-initialized filter
containing the department company.
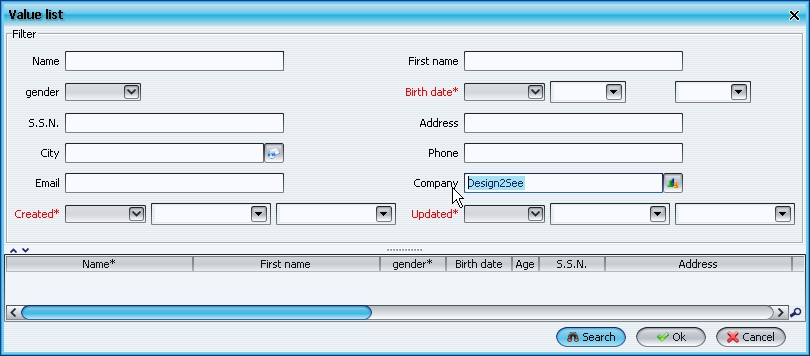
|
3- Let's reset the filter, and search for the
employee of the other company.
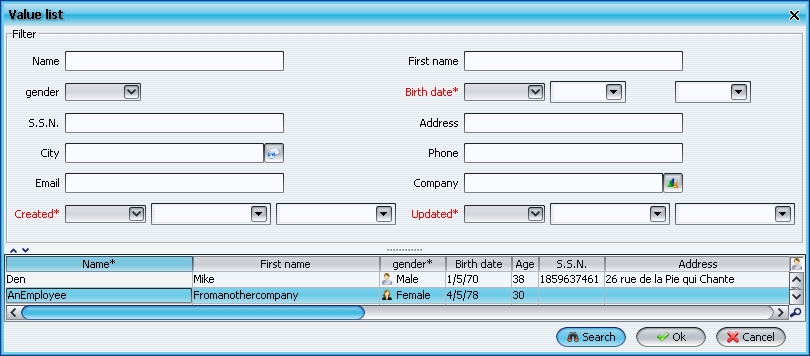
|
4- Select it as the new manager; the business rule is
violated and the end-user is notified.
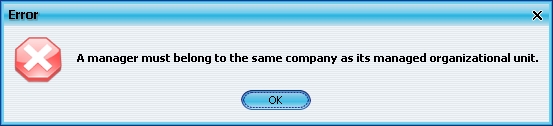
|
Managing team members
Managing team members will give us the oportunity to introduce the Jspresso action framework. Actually, we have already used action maps and action lists to assemble simple standard CRUD operations in views (refer to the master-detail action map). This time, we need to go a little bit further since there is no out-of-the-box action to cover our needs. But don't be afraid, we will still compose Jspresso standard actions without writing a single line of java code !
We will compose 2 actions to manage team members :
The end-user can select an employee and add it to the selected team. Of course, the application must filter the employees of the company the team belongs to.
The end-user can select an existing team member and remove it from the team.
These 2 actions will be presented by a view that lists the team members of the selected team in the company management module (a somehow classic master-detail view between teams and team members). One thing that you may not pay attention to, and this is quite normal since Jspresso handles it transparently, is the fact that the relationship between teams and employees is a bi-directional N-N association. We will handle here one of the association side exactly as if it was a 1-N relationship. All the inherent complexity of this kind of association will be managed behind the scene without any extra effort.
So let's replace the teams view by a master detail view presenting the
team members in the view.groovy :
listView('Team-teamMembers.list') {
  actionMap {
    actionList('EDIT'){
      action(parent:'lovAction',
        custom:[
          autoquery:false,
          entityDescriptor_ref:'Employee',
          initializationMapping:['company':'company'],
          okAction_ref:'addAnyToMasterFrontAction'
        ]
      )
      action(ref:'removeAnyCollectionFromMasterFrontAction')
    }
  }
}

split_vertical('Departments.and.teams.view',
  cascadingModels:true,
  top:'Company-departments.table') {
  bottom {
    split_horizontal (
      left:'Department-teams.table',
      right:'Team-teamMembers.list',
      cascadingModels:true
    )
  }
}
We declare a new list view to present the team members of a team. This view is backed by the team -> team members relationship. We assemble a brand new action map (map of action lists) for this view. This action map will contain a single action list that holds our 2 actions. We declare the single action list... ... and the actions it holds. The selection action is a kind of list of values (LOV) action (listing existing employees). We reuse the built-in Jspresso LOV action (actually inheriting its spring definition) and customize it to meet our needs. We don't want to query the backend for all available employees as soon as the end-user triggers the action; it is an arbitrary decision that is lead by the fact that a company may actually employ thousands of people ! So let the end-user fill-in some criteria before actually triggering the search. The LOV action retrieves employees so we configure it accordingly. As for relationships, we initialize the LOV filter with the company of the selected team. Then we need to tell the action what to do when the end-user has selected the employee to add... ... by registering another Jspresso built-in action that adds an arbitrary collection of objects (in our case the LOV selected employee) to the master model on which it was triggered (the selected team). Removing a team member is somehow easier. We just reuse another Jspresso built-in action that removes an arbitrary collection of objects (in our case the selected employees) from the master model on which it was triggered (the selected team). Then we need to slightly update the department and teams view to include the team members view. So we register the view created above... ... and configure it to cascade models so that the team backing the team members view is retrieved from the selection in the department teams view.
With approximately 30 new lines of SJS, you achieve things that would normally require hundreds !
The following screenshots shows the result :
1- We display a company organization. notice our new
team members view.

|
2- Notice how the 2 actions have been installed and
configured (e.g. icons and tooltips).
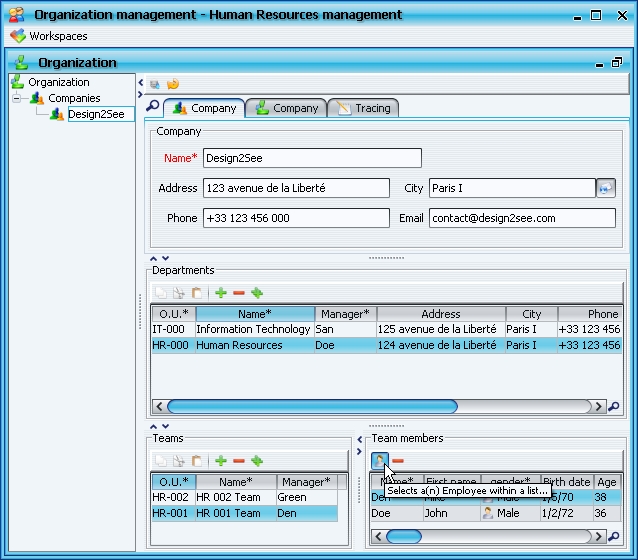
|
3- Let's trigger the employee selection. The filter
is pre-initialized.

|
4- Search for employees filtering on
name.
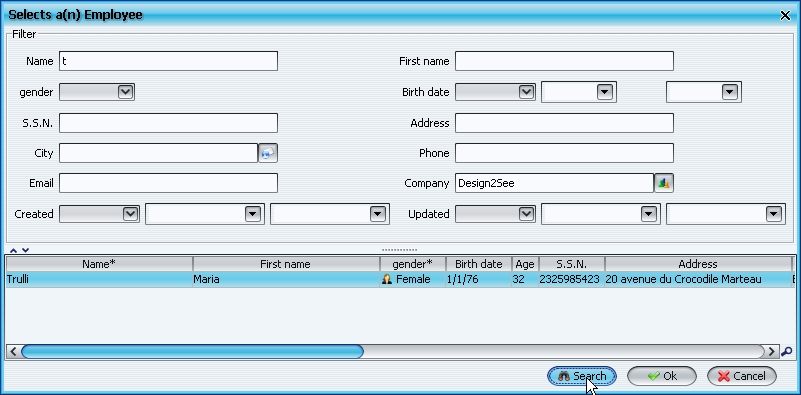
|
5- Select one of the employee. The team members is
updated.
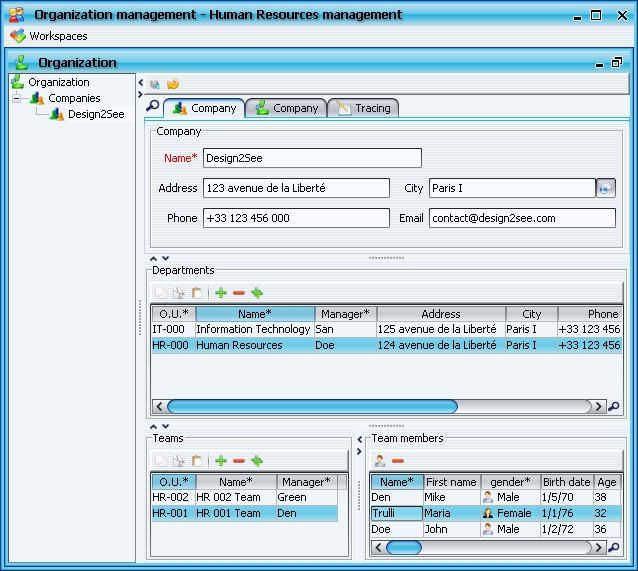
|
4- Since it is a N-N relationship, the added employee
still belongs to its former teams.
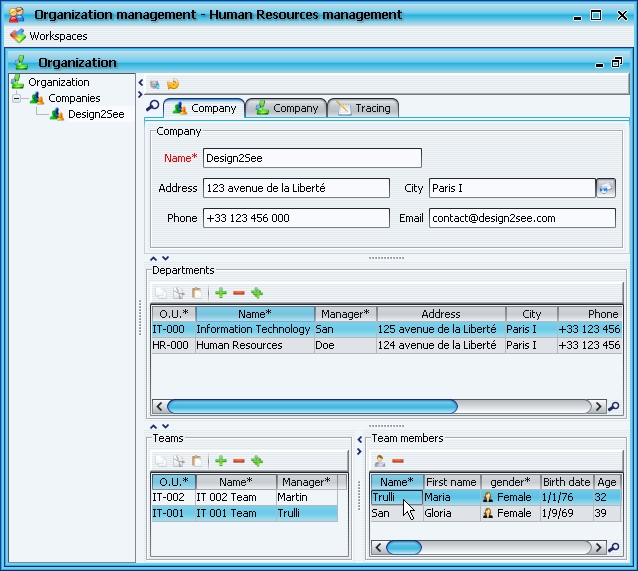
|
Jspresso comes with tens of configurable built-in actions like the ones we've just used (wizards, user decisions through pop-ups to control the application flow, reporting, file download, ...). This is beyond the scope of this section to list them all but remember that those built-in actions should cover 100% of your standard needs. And whenever you may encounter specific requirements during the business analysis, you still have the option to write your own actions leveraging the full power of the framework with a whole set of abstract action classes to inherit from.
Securing the application access : Authorization
As we covered it before, securing an application requires 2 features : authentication and authorization. We've already discussed about authentication and JAAS login modules. JAAS also deals with authorization but in a way that is strongly related to the java code. Basically, it allows for securing java methods and requires modifications in the source code.
The Jspresso framework covers the authorization part in a much more declarative and loosely coupled way. All you need to do is to declare the granted roles (you may name them profiles or groups) on the application component you want to secure the access to. Among the securable application components, you will find :
Workspaces
Modules
Actions
Views
View parts like columns in table views or properties in component views
Components (and of course entities)
Components (and entities) properties
For workspaces, modules and actions, the end-user will be notified that he is not granted access to this part of the application.
For views and view parts, the framework will simply hide at runtime the corresponding graphical component (a table column for instance).
For components and component properties, an access not granted will hide all the views (or view parts) backed by the corresponding model. Note that the authorization is not enforced on the model itself because our experience shows that such a behaviour can lead to really problematic side effects. For instance, a user can be granted access to an action that behind the scene updates a property (through a component service for instance) that he is not granted access to. An unexpected security exception then occurs that is hardly understandable... So the overall philosophy is to secure the caller and not the callee (the view, the web service, ... and not the model).
The Jspresso login modules assign roles (that may be hierarchically declared) to the successfully logged-in user. Then, whenever on of the components listed above is solicited by the end user, the framework checks the access according to the declared granted roles.
Note
An application component with no granted roles assigned is considered to be accessible by anyone; this is what we have done until now.
Restricting access to the application components
So let's use the 3 profiles we have collected during the business requirement : "organization-manager", "staff-manager" and "administrator". We will secure the application workspaces accordingly :
workspace('employees.workspace',
  ...
  grantedRoles:['administrator','staff-manager']) {
  ...
}

workspace('organization.workspace',
  ...
  grantedRoles:['administrator','organization-manager']) {
  ...
}
We grant employees workspace access to the "administrator" and "staff-manager" roles. Same applies for the organization workspace below.
Believe it or not, you don't have to write anything else! The exact same kind of declarations apply to all the securable components. It would have been even shorter if we had used a smarter login module that had handled groups (or roles) nesting. In that case, we would have nest all profiles in the administrator one, making the administrator inherit all the authorizations of its nested groups. Then we could simply have omitted the administrator declaration in the workspaces granted roles.
Testing the authorizations enforcement
The Jspresso development login module allows for arbitrarily changing the user role so that authorization can be quickly and efficiently tested. We will use this feature to test the workspace restrictions that we have declared above.
So let's assign the “staff-manager” role to our demo user by modifying
the configuration of the development login module in the jaas.config
file :
/** Login Configuration for the HR sample application **/

hrsample {
   org.jspresso.framework.security.auth.spi.DevelopmentLoginModule required
       user=demo
       password=demo
       roles="staff-manager"
       custom.language=en;
};
When logged-in, the demo user will be assigned the “staff-manager” role. You can even assign multiple roles to the development user by listing them separated by comas; in that case, the JAAS configuration syntax makes the use of double quotes mandatory to surround the list.
When you then try to launch the organization workspace, the following notification pops-up :
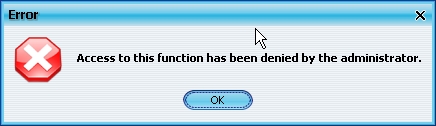
An other example of authorization enforcement might be that you want to hide all the tracing properties unless the logged-in user is "administrator"; simply add the corresponding granted roles on the tracing property descriptors and all your GUI will be instantly impacted.
Packaging and deploying
Last but not least, we need to package and deploy the final application. Choosing the target environment highly depends on the requirements. Jspresso supports as of now 5 different deployment scenarios : Swing, AJAX (qooxdoo) and Flash (Flex).
A quick overview of options
For swing you should simply package your application classes and resources in a jar (or multiple jars) and distribute it on the clients either manually or through a more advanced deployement mechanism like Java Web Start. Be aware in that case that the client JVM will handle everything except the database and that the network will support the JDBC calls from the application backend. This 2-tier architecture is certainly not the preferred scenario when you have limited bandwith between the clients and the server or limited resources on the client machines but it might perfectly fit for a limited number of clients residing on the same LAN than the database server. Although, this option is not commonly considered as a good option, it should not be underestimated especially when dealing with small-scale deployments.
Qooxdoo and Flex deployments require a servlet 2.5 compatible application server (Apache tomcat is one of them, free and production-robust). This means that you can just package your application as a WAR archive and drop it in the application server to have it deployed. Jspresso, although very powerful and flexible doesn't require an overkilling, latest specifications compliant, application server. Once this is said, there are times when your application specific needs might require one of them. For instance, if you need some heterogeneous transaction capability and must use a full fledged JTA compliant transaction service, you have little other choice than going to one of the market big application servers. Of course, we encourage you to stay in the free and opensource world.
We won't discuss here the database side since Jspresso database support is directly linked to the Hibernate database support.
Note
Refer to the Hibernate documentation to get a complete understanding of the support and limitations of the database engine you plan to deploy. By the way, you will rarely find any limitation on this side regarding the huge and excellent support Hibernate has on almost each and every common database vendors.
Jspresso introduced with the 3.0 release a native support for Adobe's Flex. As for the other deployment options, there is absolutely nothing to code against the Flex API (no MXML, no ActionScript). Jspresso takes care at runtime of the frontend display and client/server communication through :
a generic Flex rendering engine that reads everything it needs from the server side
a generic communication layer based on BlazeDS that takes care of exchanging low-level GUI commands back and forth with the server.
Your Jspresso application will then be able to run in any Flash enabled browser.
Starting from the 3.5 release, Jspresso supports qooxdoo, a very high quality Javascript UI library (qooxdoo is actually more than that, so feel free to dig into their web site). The Jspresso qooxdoo UI channel shares the same architecture than the Flex UI channel. Beyond the custom qooxdoo java RPC servlet, the same codebase is used to adapt the client server communication.
Whatever option you take to deploy your Jspresso application (you may choose all of them), everything is already prepared in the project and the Maven build will take care of every complicated packaging steps.
Packaging the application WAR archive
Surely the shortest section of the manual. Just launch :
mvn package
Go to hrsample/webapp/target/ and you will have a ready-to deploy war
archive containing your Jspresso application. The generated Jspresso
project is also ready to to be used in Eclipse WTP. Just add it to the
Eclipse managed Tomcat you've created when setting-up the development
environment and start the server.
Deploying to the application server
Now that you have a complete WAR archive, it is time to deploy it in the
application server. This step highly depends on the application server
you will choose and ranges from a simple copy into a deployment
directory to the use of a specific deployment tool; so refer to the
documentation of your J2EE server to know how to perform this task. As
an example, in the Apache Tomcat AS, deploying a WAR is a matter of
copying it to the webapps/ directory.
There is still one thing to achieve before being able to go live. The
JAAS configuration (held in the jaas.config file) is a per-JVM
configuration. This means that you cannot package your jaas.config
file into the WAR itself, but you need to make it accessible somewhere
in the environment so that you can refer to it in the
java.security.auth.login.config java system property on the
application server JVM level (as we did it at development time for the
standalone swing application). The jaas.config file will then gather
the JAAS configurations of all the applications deployed in your
server. Again, refer to the documentation of your J2EE server to know
how to set a java system property in your application server instance.
As an example, in the Apache Tomcat AS, setting a system property is
achieved by setting the CATALINA_OPTS environment variable, e.g. :
CATALINA_OPTS=-Djava.security.auth.login.config=/path/to/my/jaas.config
We can now see the result of the deployment.
The first Flex launch
Point your browser to the flex context :
http://[machine]:[port]/hrsample-webapp/flex/
The browser shows you the Flex login dialog.
And you can play with the same application but in Flash !
The first qooxdoo launch
Point your browser to the qooxdoo context :
http://[machine]:[port]/hrsample-webapp/qooxdoo/
The browser shows you the qooxdoo login dialog.
And you can play with the same application but in Javascript using the qooxdoo library !
Congratulations! we have now closed the circle and in tenth of the effort usually required to achieve the equivalent, we developped and deployed a multi-channel, distributed desktop-like business application.